Changelog
Follow up on the latest improvements and updates.
RSS
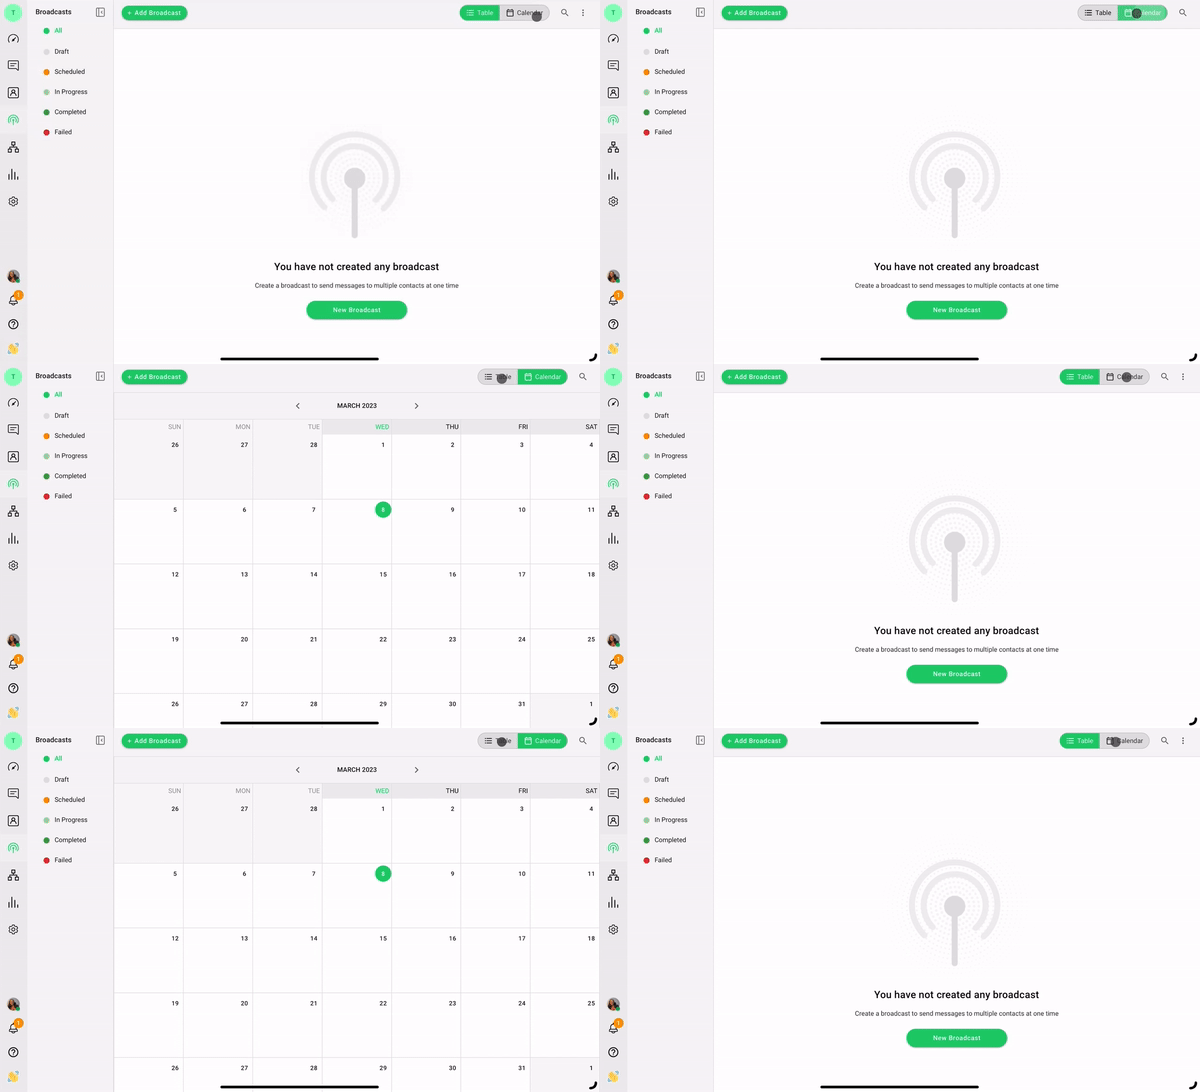
Say hello to the newly revamped Broadcast Module by YesHello! With a host of improvements and new features, sending broadcasts has never been easier. Elevate your messaging strategy with the comprehensive upgrades and take your communication game to the next level.
Target Contacts More Effectively
Segment Contacts Based on Contact Fields, Tags or Conditions
The standout feature of the revamped Broadcast Module is Contact Segment, which allows you to create segments based on Contact Fields, Tags or conditions. This new capability lets you easily and precisely define a target audience for each broadcast.
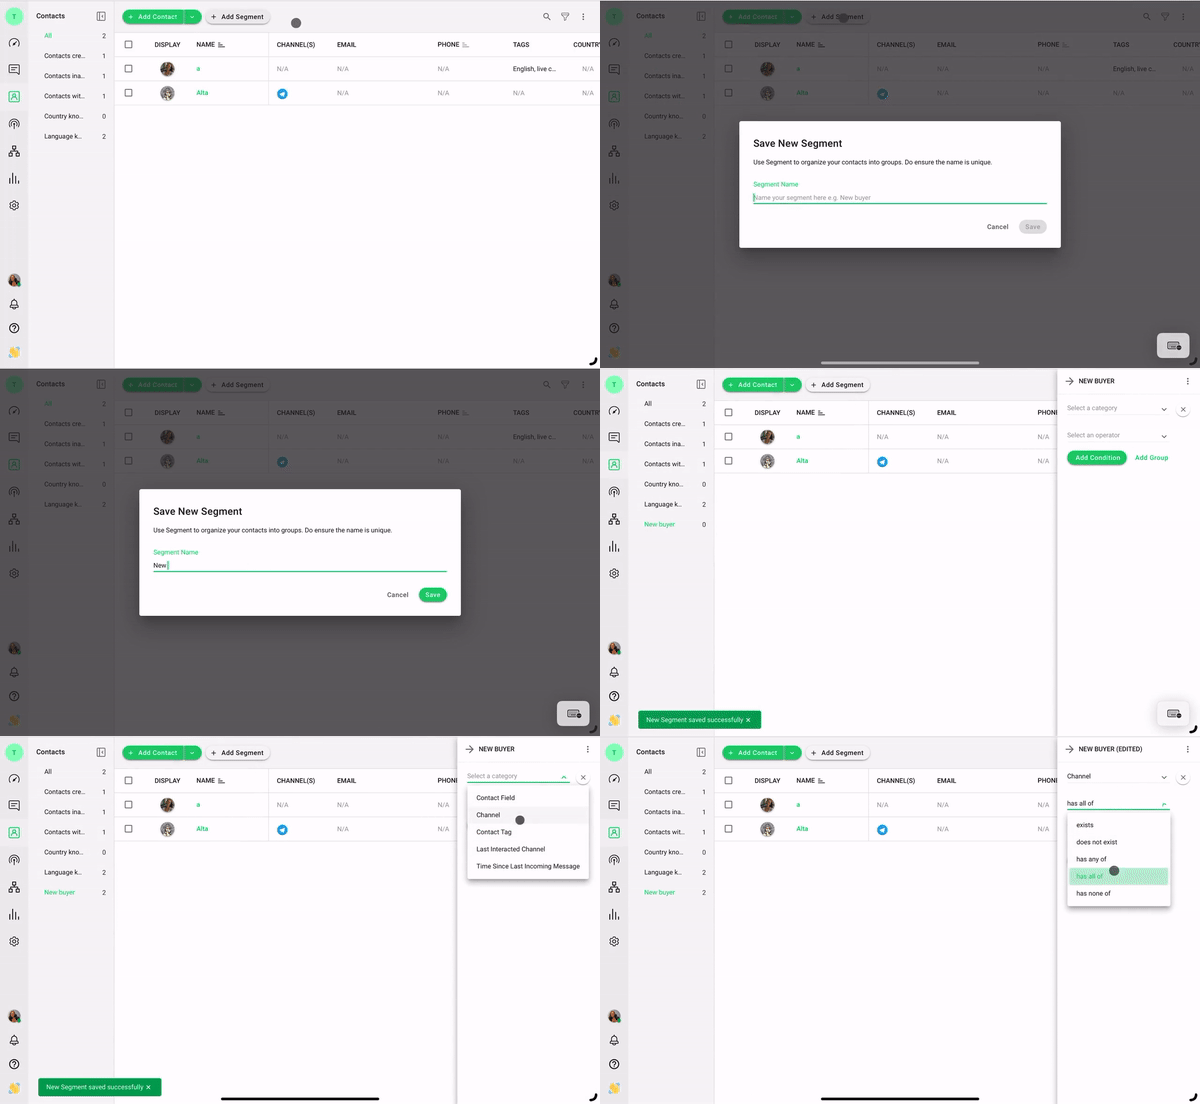
Defining conditions for each Segment also means Contacts will automatically enter or exit a segment depending on their condition fulfillment! Refer to this guide to create a segment in the Contacts Module now.
Improve Reach by Broadcasting to Contacts’ Last Interacted Channel
Don’t limit broadcasts to channels your Contacts may not be as active on or risk spamming them by sending duplicate messages across channels to gain their attention.
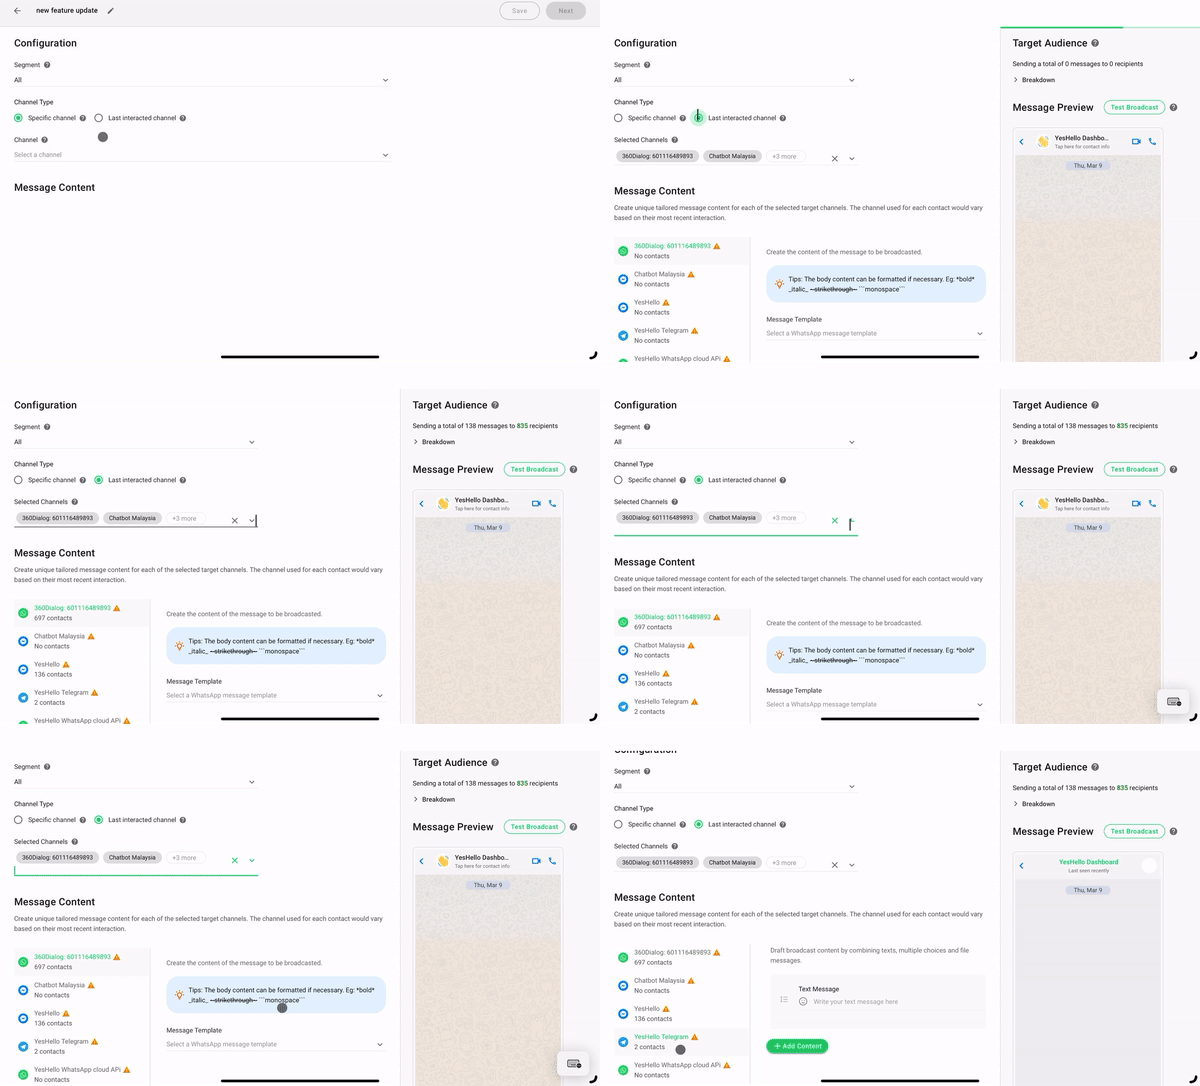
Instead, broadcast messages to the last channel a Contact interacted with. This increases the visibility and potential engagement rates of your broadcasts.
You can also send unique content for each channel according to its supported capabilities — such as images, emojis, Facebook Message tags or WhatsApp template messages — and exclude specific channels from the broadcast if you like.
More Flexibility in Creating and Sending Broadcasts
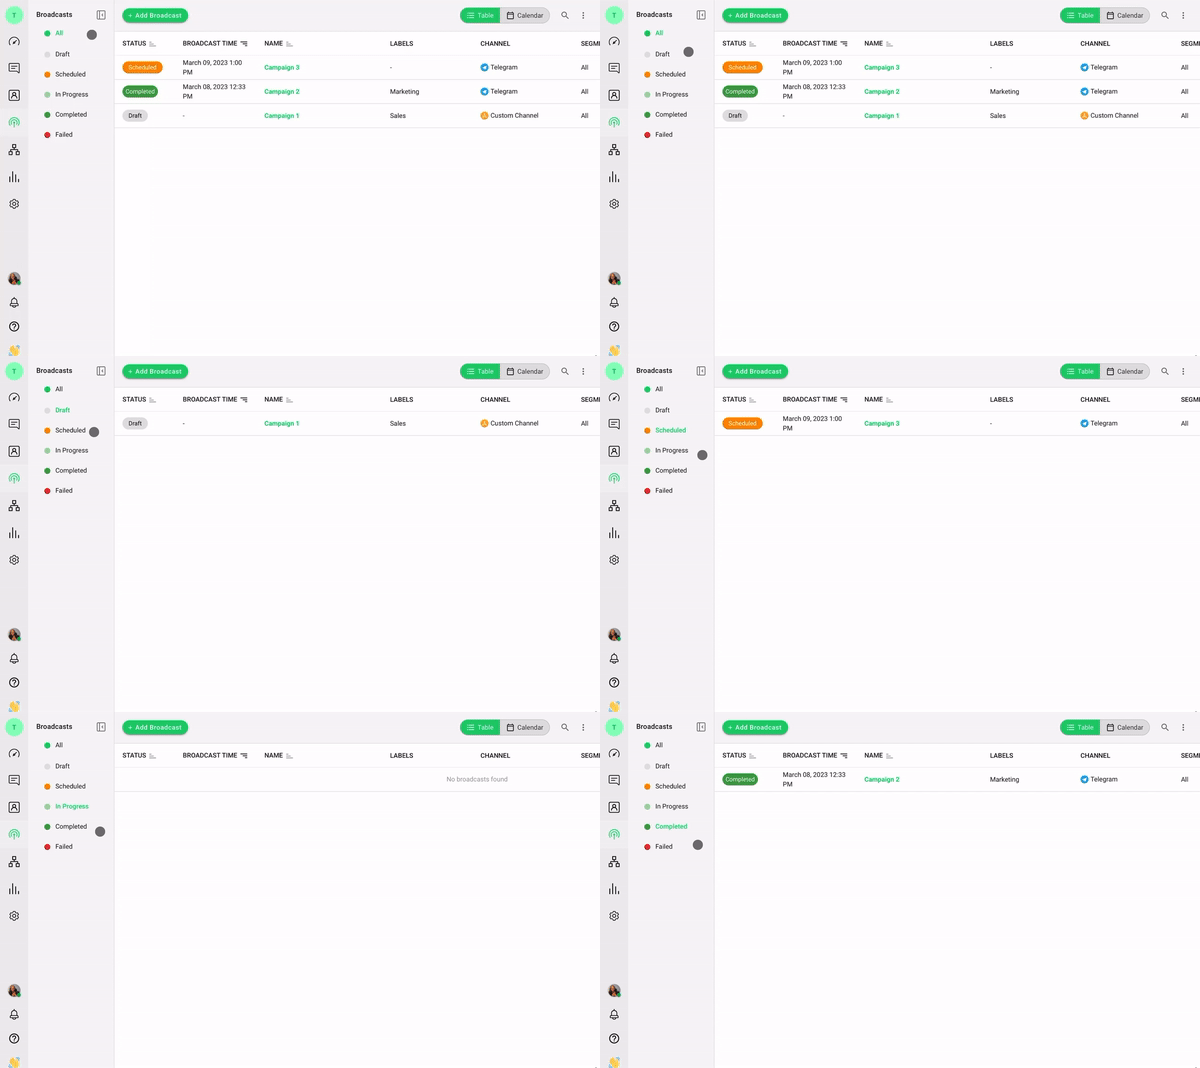
Save Broadcasts as Drafts
Need to tweak your broadcast or audience targeting? Instead of deleting a broadcast and rebuilding it from scratch with the right content and settings, you can now simply edit it.
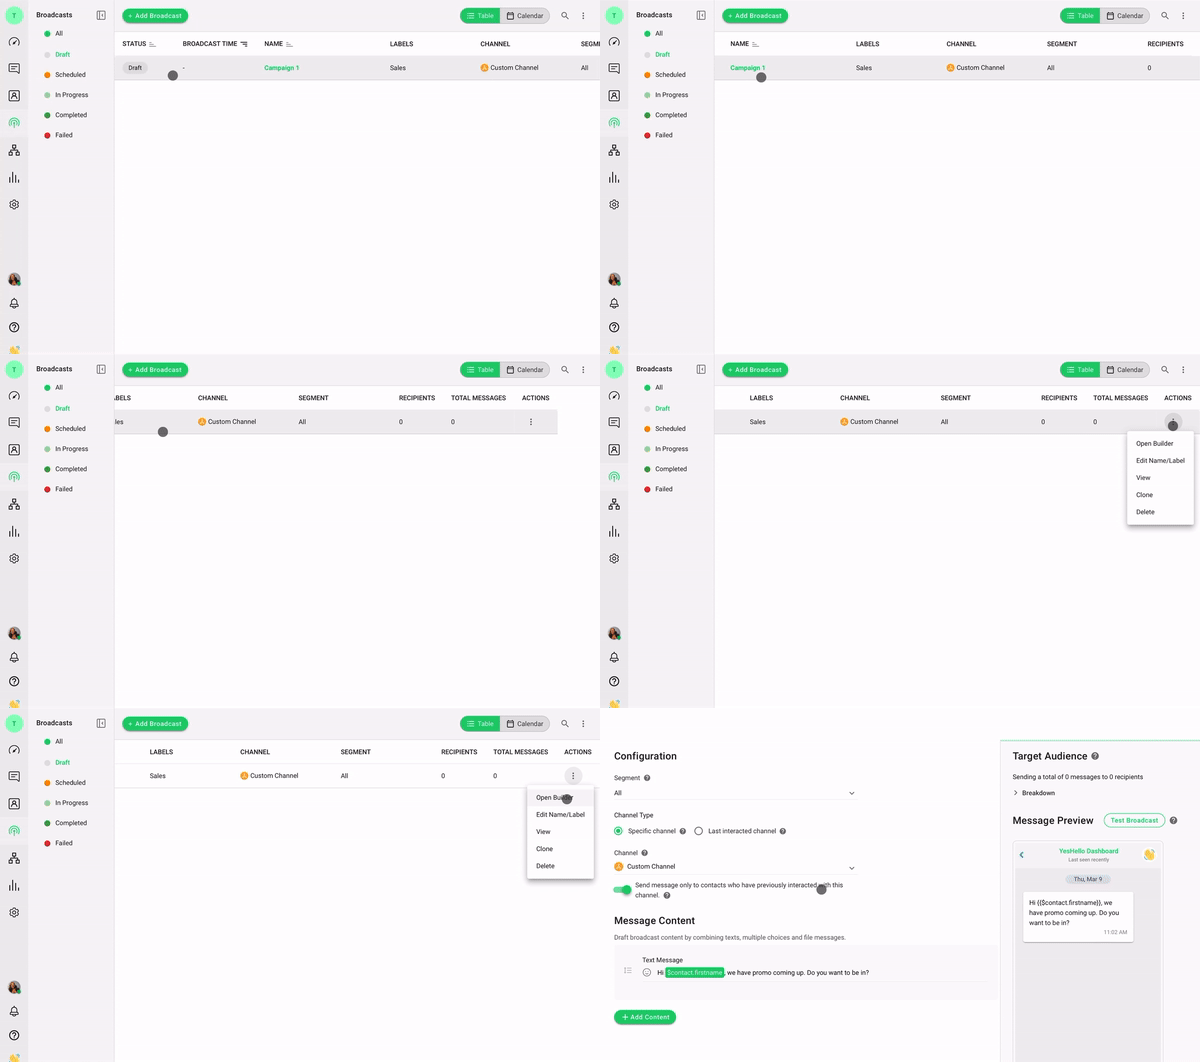
With the new release, broadcasts are created in draft status by default and will remain there until you schedule or send them. This allows you to make changes or reschedule broadcasts up until the last minute.
View All Details about a Broadcast at a Glance in the New Broadcast Builder
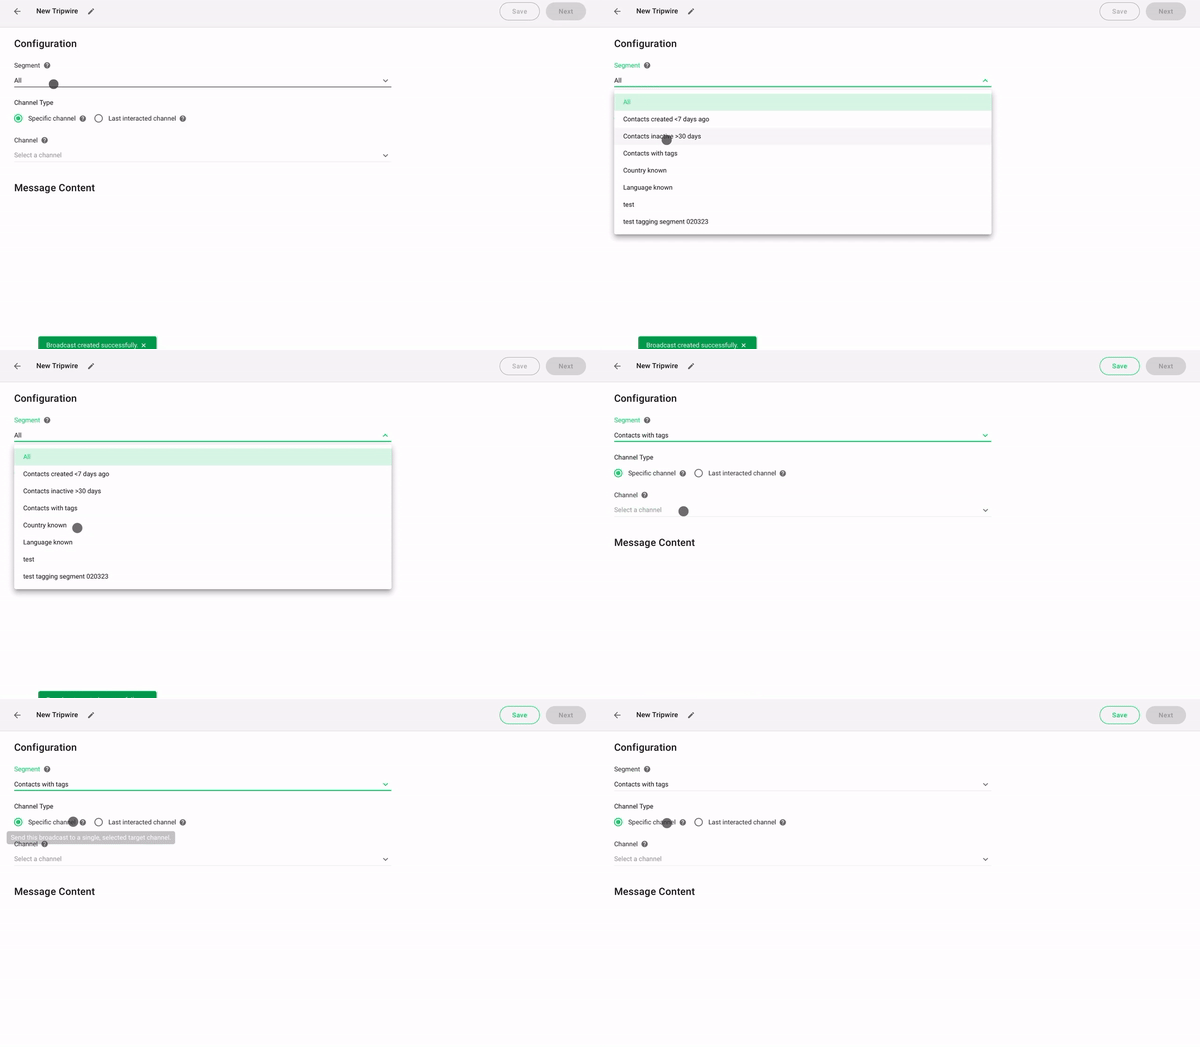
The all-new broadcast builder lets you configure a broadcast across multiple channels simultaneously, preview each message and send test broadcasts.
In the Target Audience section of the builder, you can also view the estimated number of messages that will be sent across channels and the number of recipients who will receive the broadcast.
It will even detail the number of target audiences who fulfill the Segment criteria but are excluded as they are not present on the selected channels to aid decision-making about channel choices.
Customize Broadcast Send Rate
Perhaps you want to control your broadcast send rate so your bulk messages are delivered faster or slower than usual.
Now, you can customize the send rate to broadcast messages at the rate that works best for your business.
Note that this is an add-on feature, so please contact our sales team to learn more.
We're excited to announce the release of our new webhooks events 🎉. Want to stay updated on critical events happening in YesHello? You can now receive notifications about these events or automatically provide information to other platforms when events occur in YesHello.
The list of supported events includes:
- New incoming or outgoing message
- Conversation opened or closed
- New Contact is added
- Existing Contact is updated
- Contact tag is updated
- Contact assignee is updated
- New comment is added for a Contact
To get started, go to Settings > Integration > Webhooks and configure your webhooks. You'll be able to specify which events you'd like to receive notifications for and provide the URL (endpoint) where you'd like to receive these notifications.
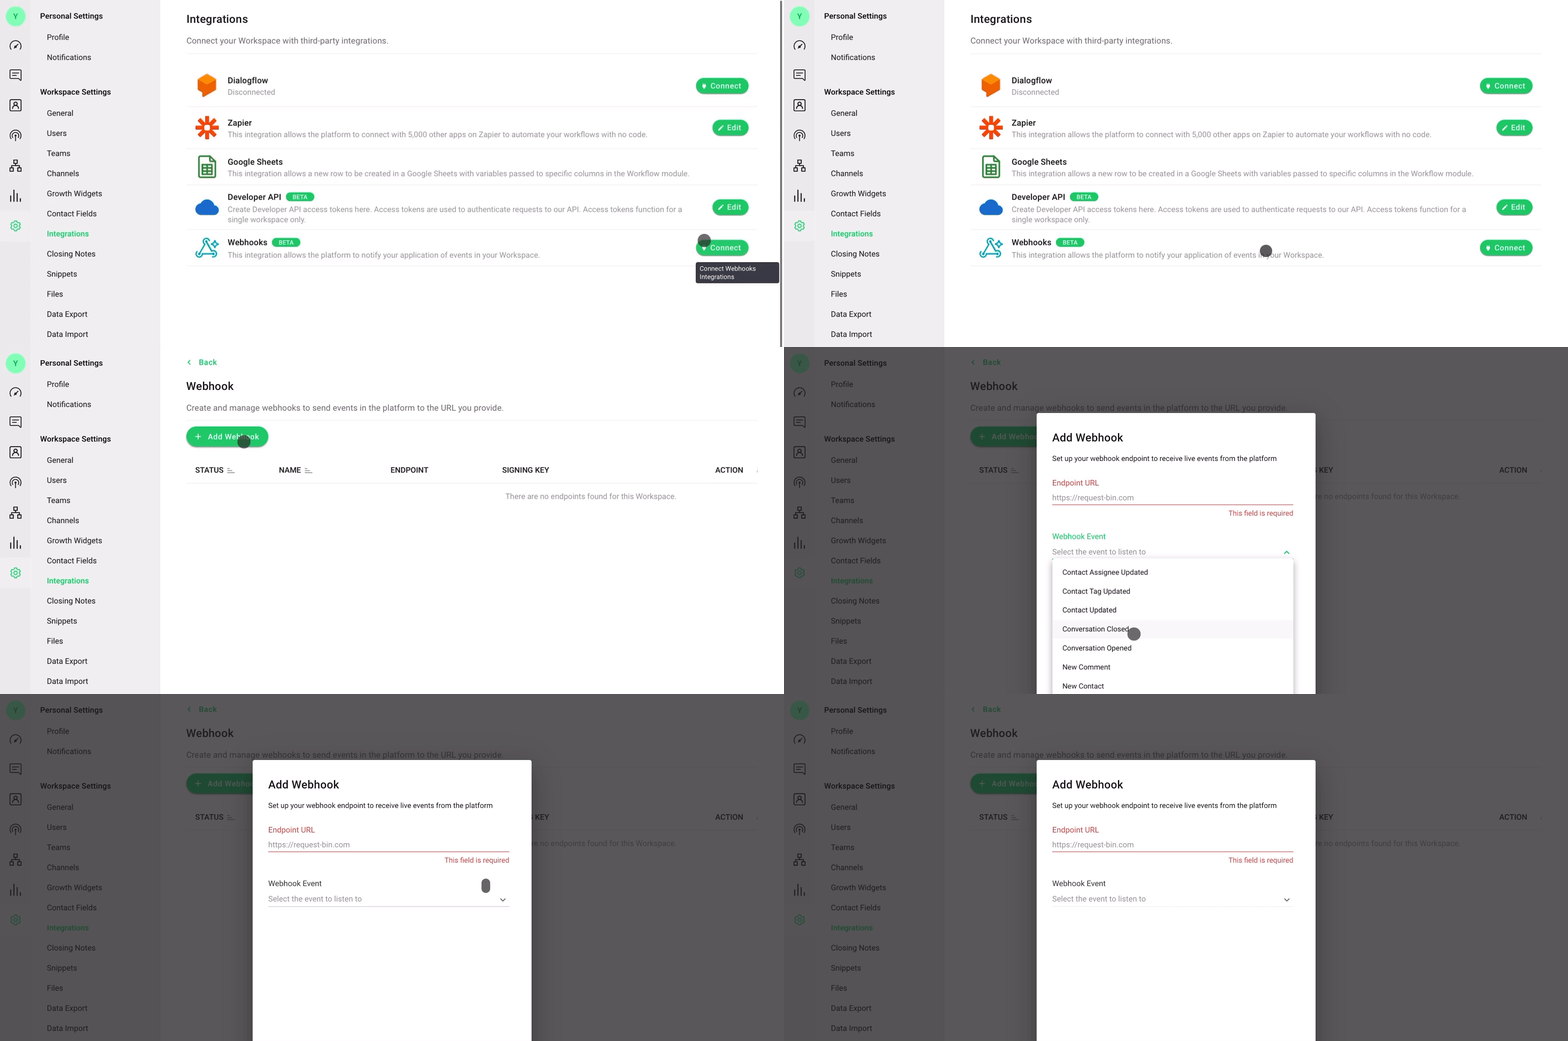
For instance, you can sync all messages on YesHello with an internal database by setting up webhooks to send all incoming and outgoing messages on YesHello to the desired endpoint.
We are building the documentation on how to use the new webhooks, stay tuned!
We are excited to announce the latest updates to our platform! Check out what's new below:
Streamline Your Workflows with New Templates 🤖
We had expanded our Workflow Templates library. The new Workflow Templates are designed to help you streamline your customer service process and get more insights into your customers' needs. Here are some of the new templates and their use cases:
- Create Chat Menus:Use this template to create a menu that customers can use to quickly navigate to the right support resource.
- Get Customer Satisfaction (CSAT) and Store Results:Use this template to automate customer satisfaction surveys and store the results in Google Sheets or your data warehouse for easy analysis.
- Escalate Issues:Use this template to automatically escalate issues to the right team or agent when they can't be resolved in a timely manner.
- Transfer Shifts Automatically:Use this template to automate the transfer of conversations from one agent to another when a shift change occurs.
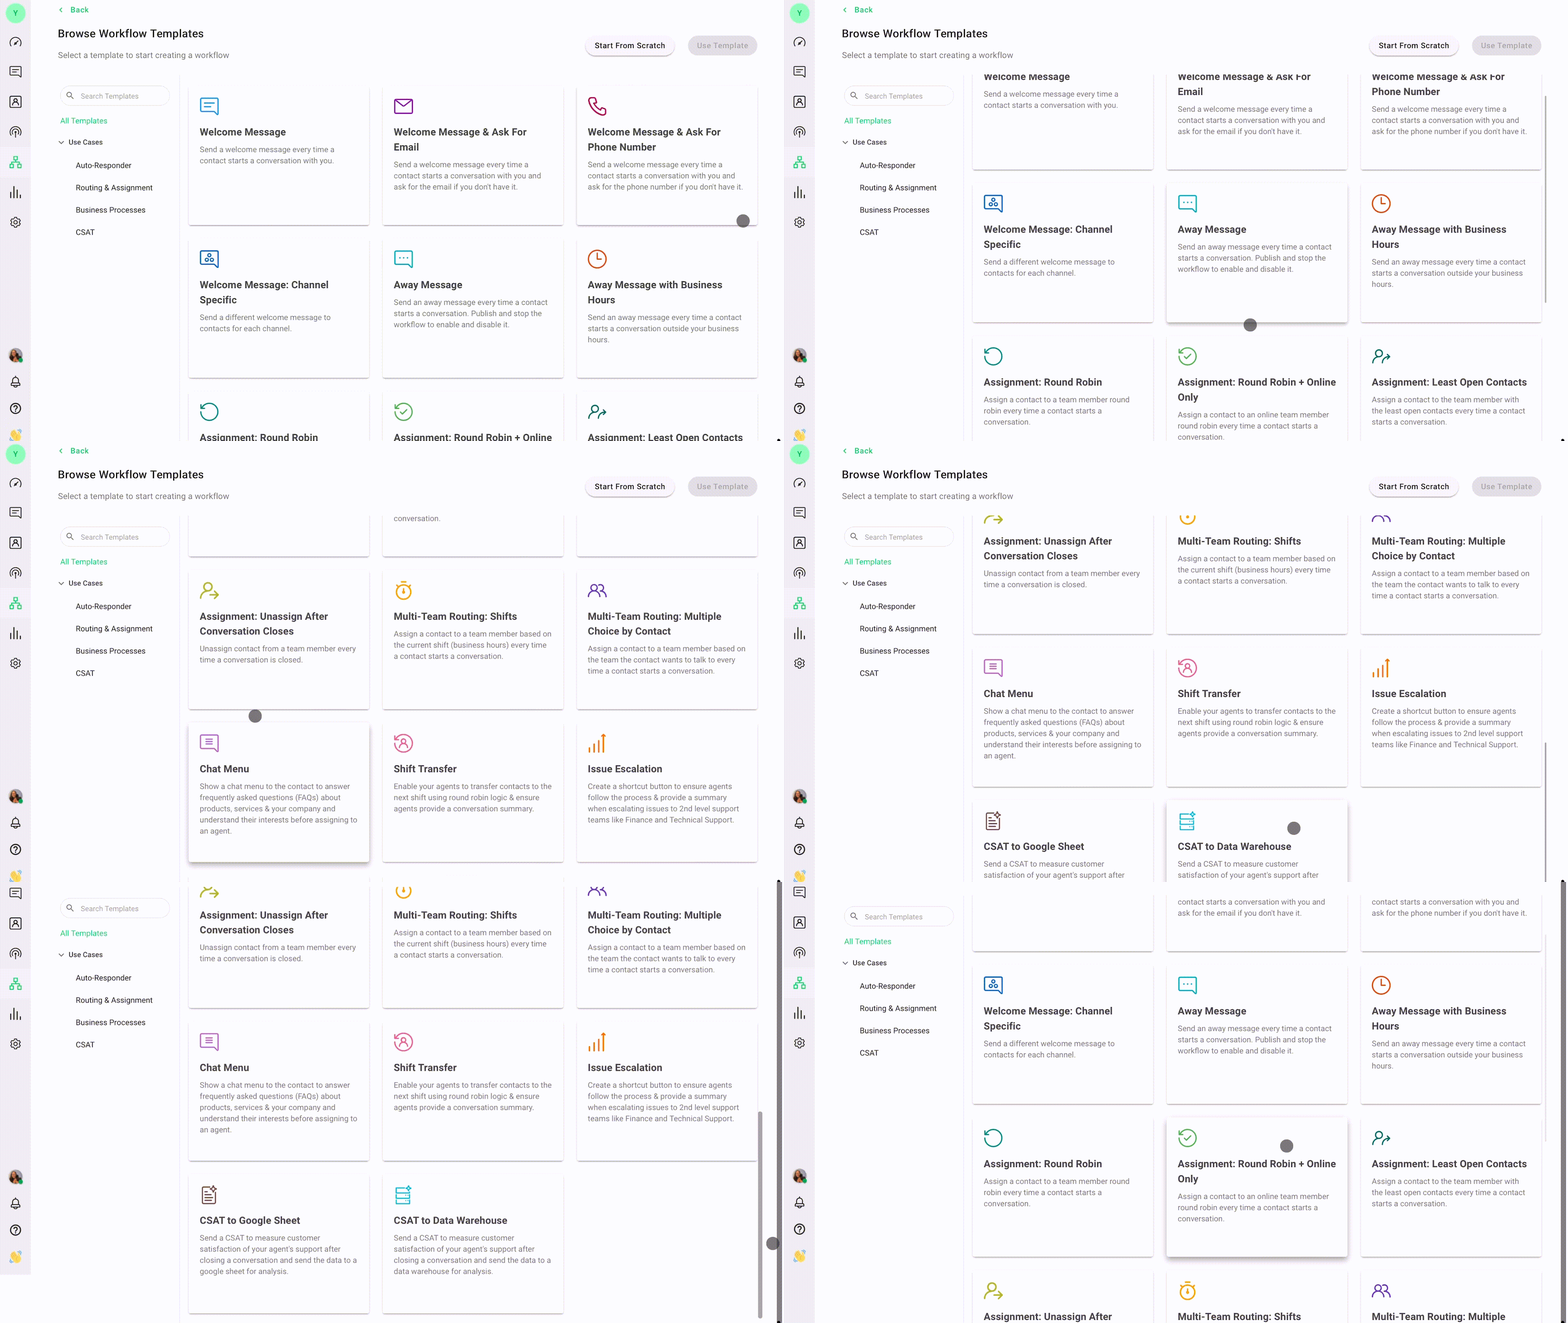
Check out all the new templates now to see how they can improve your customer service process.
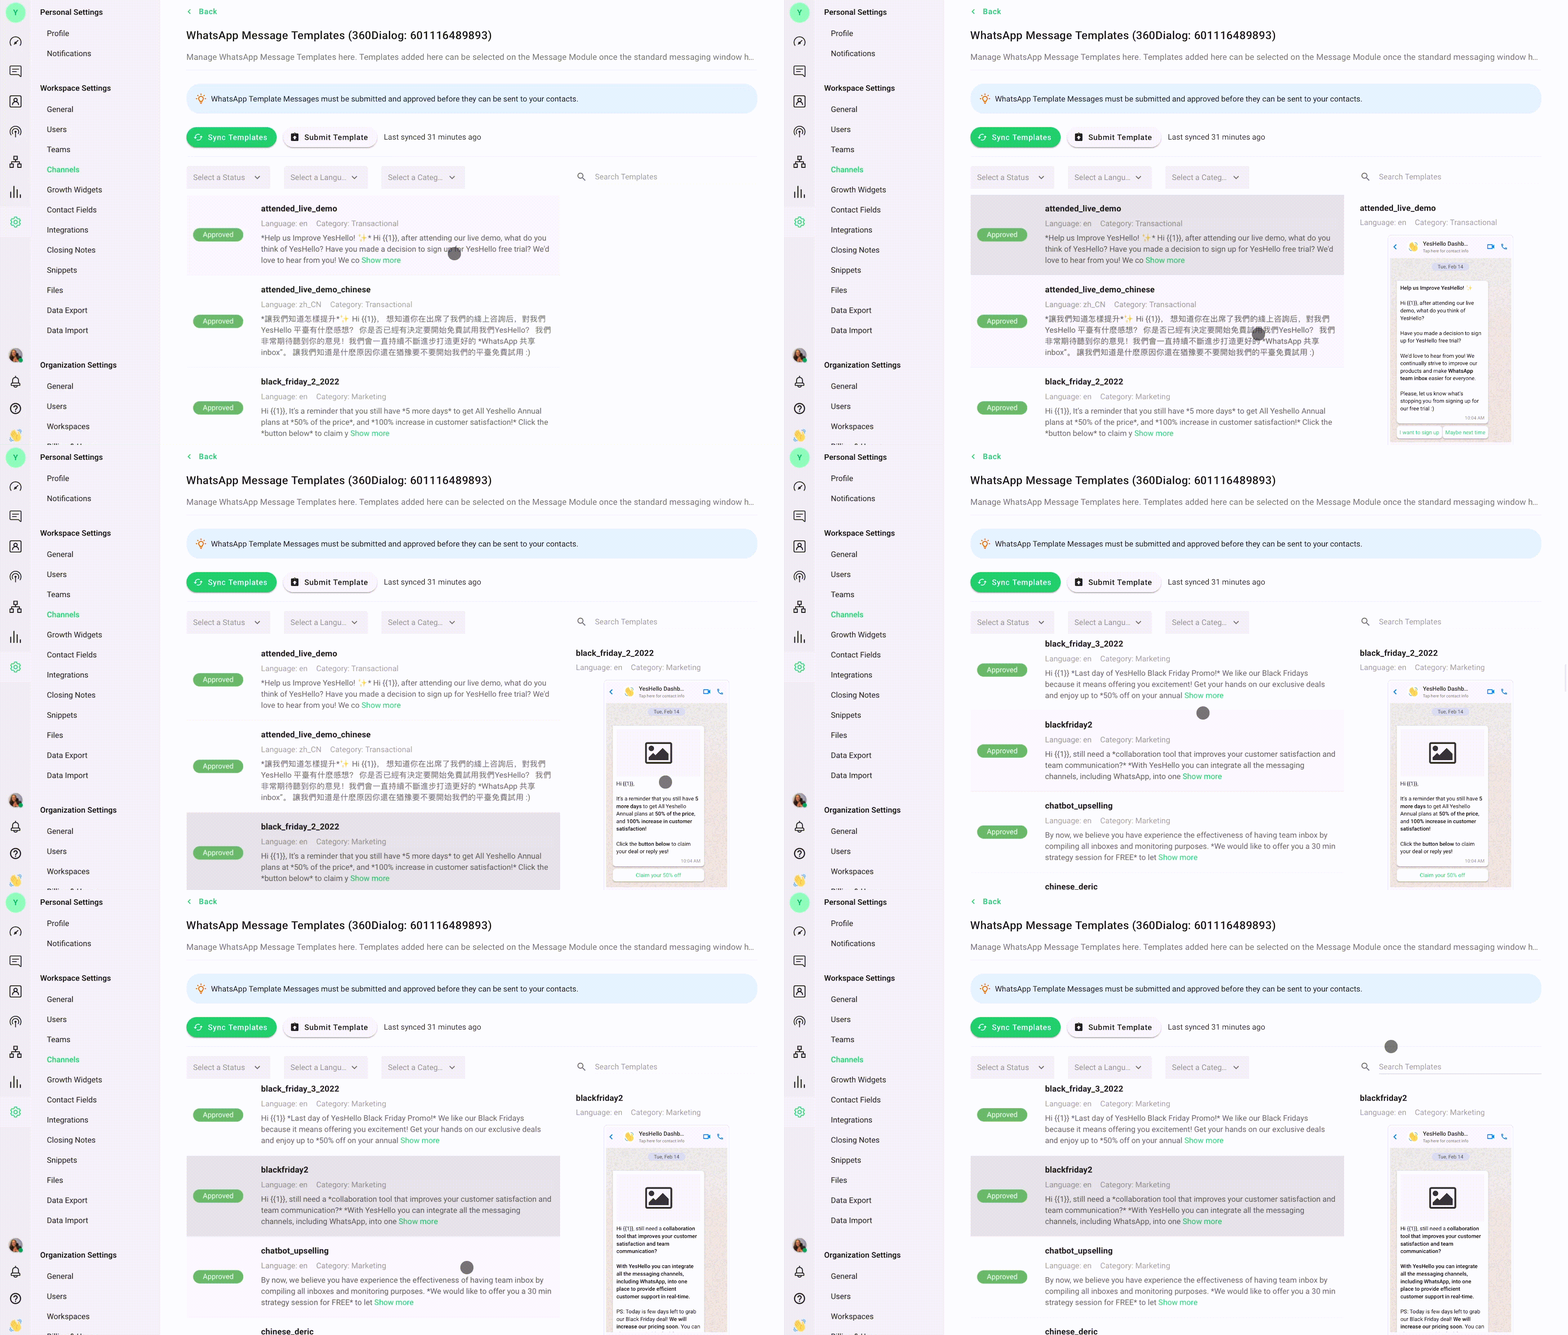
Improved WhatsApp Template Manager
Finding the right WhatsApp template just got easier! We have added filters for languages and categories to the WhatsApp Template Manager, and you can now preview templates including headers and footers, not just their content.
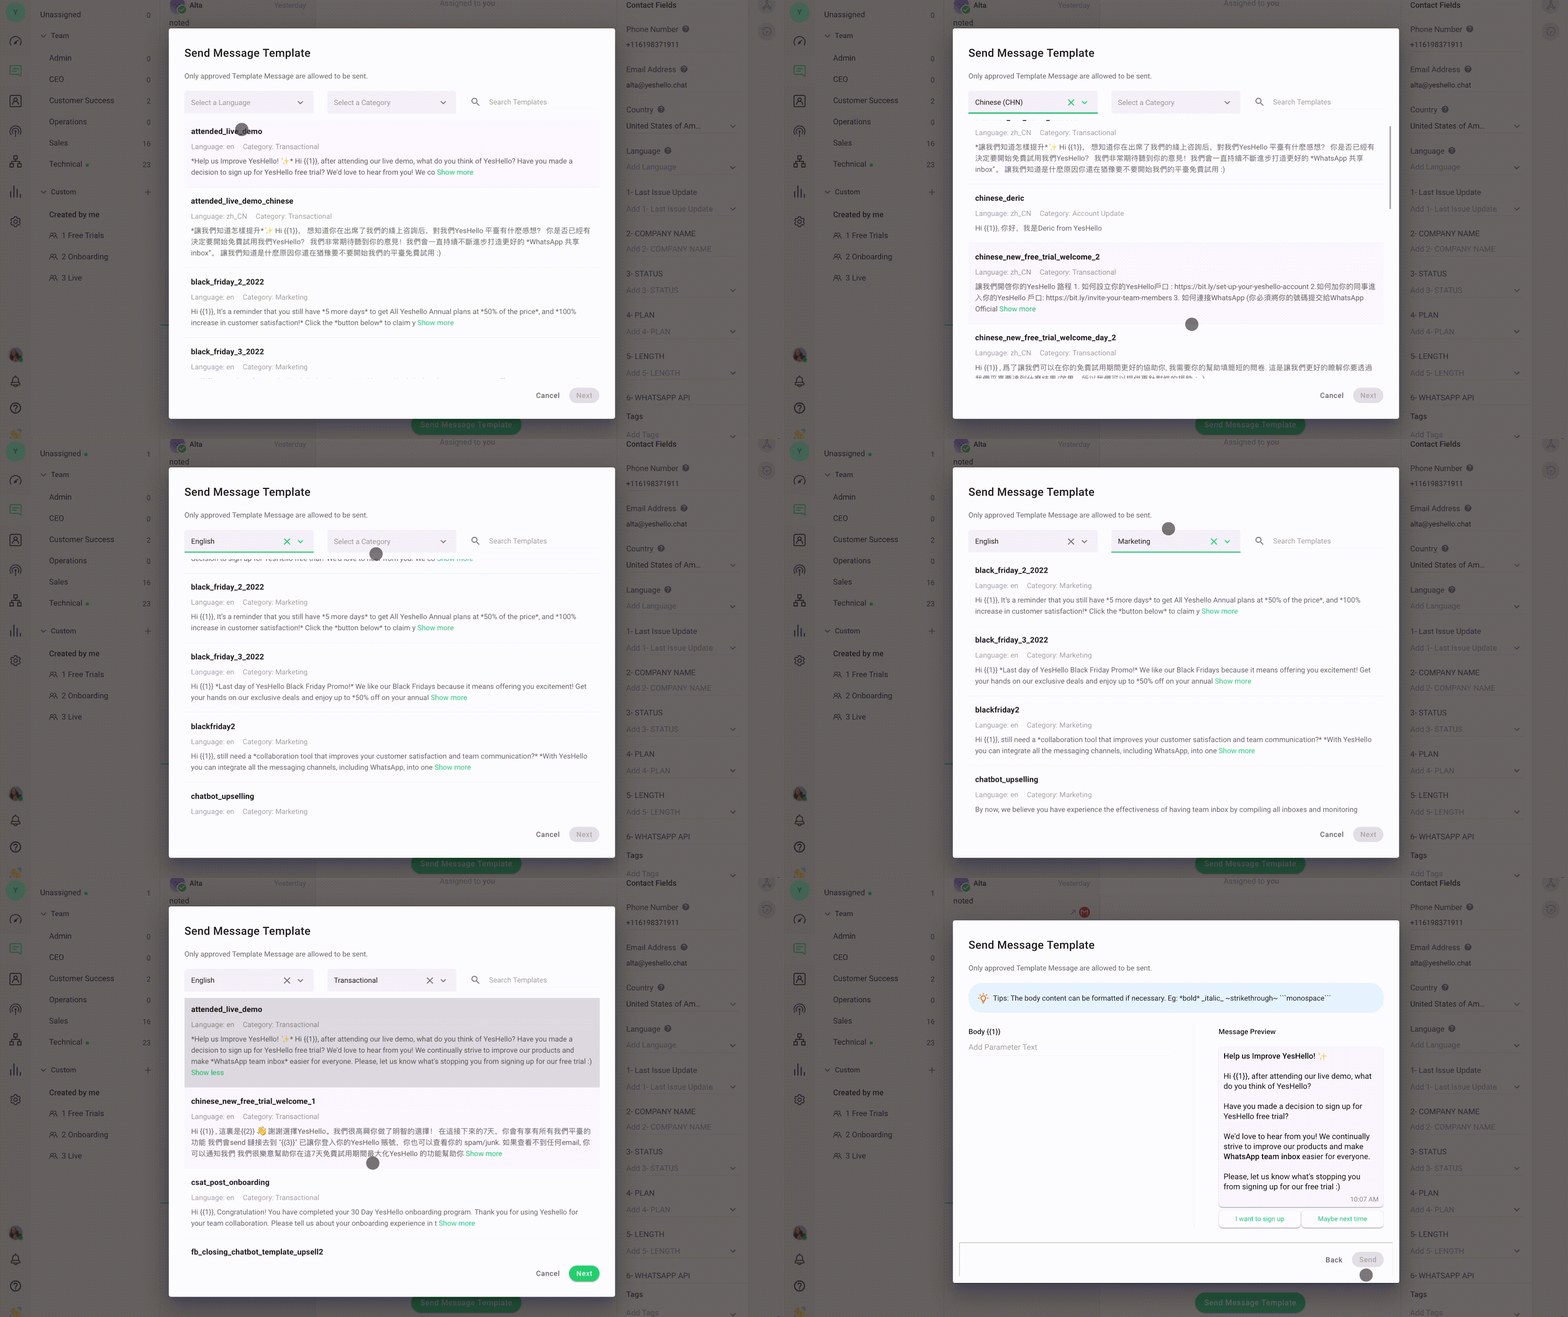
Sending WhatsApp Template Messages, Improved
Say goodbye to endless scrolling! You can now quickly find the right WhatsApp template with our new search bar and filters. Plus, you can preview the content of each template before selecting it.
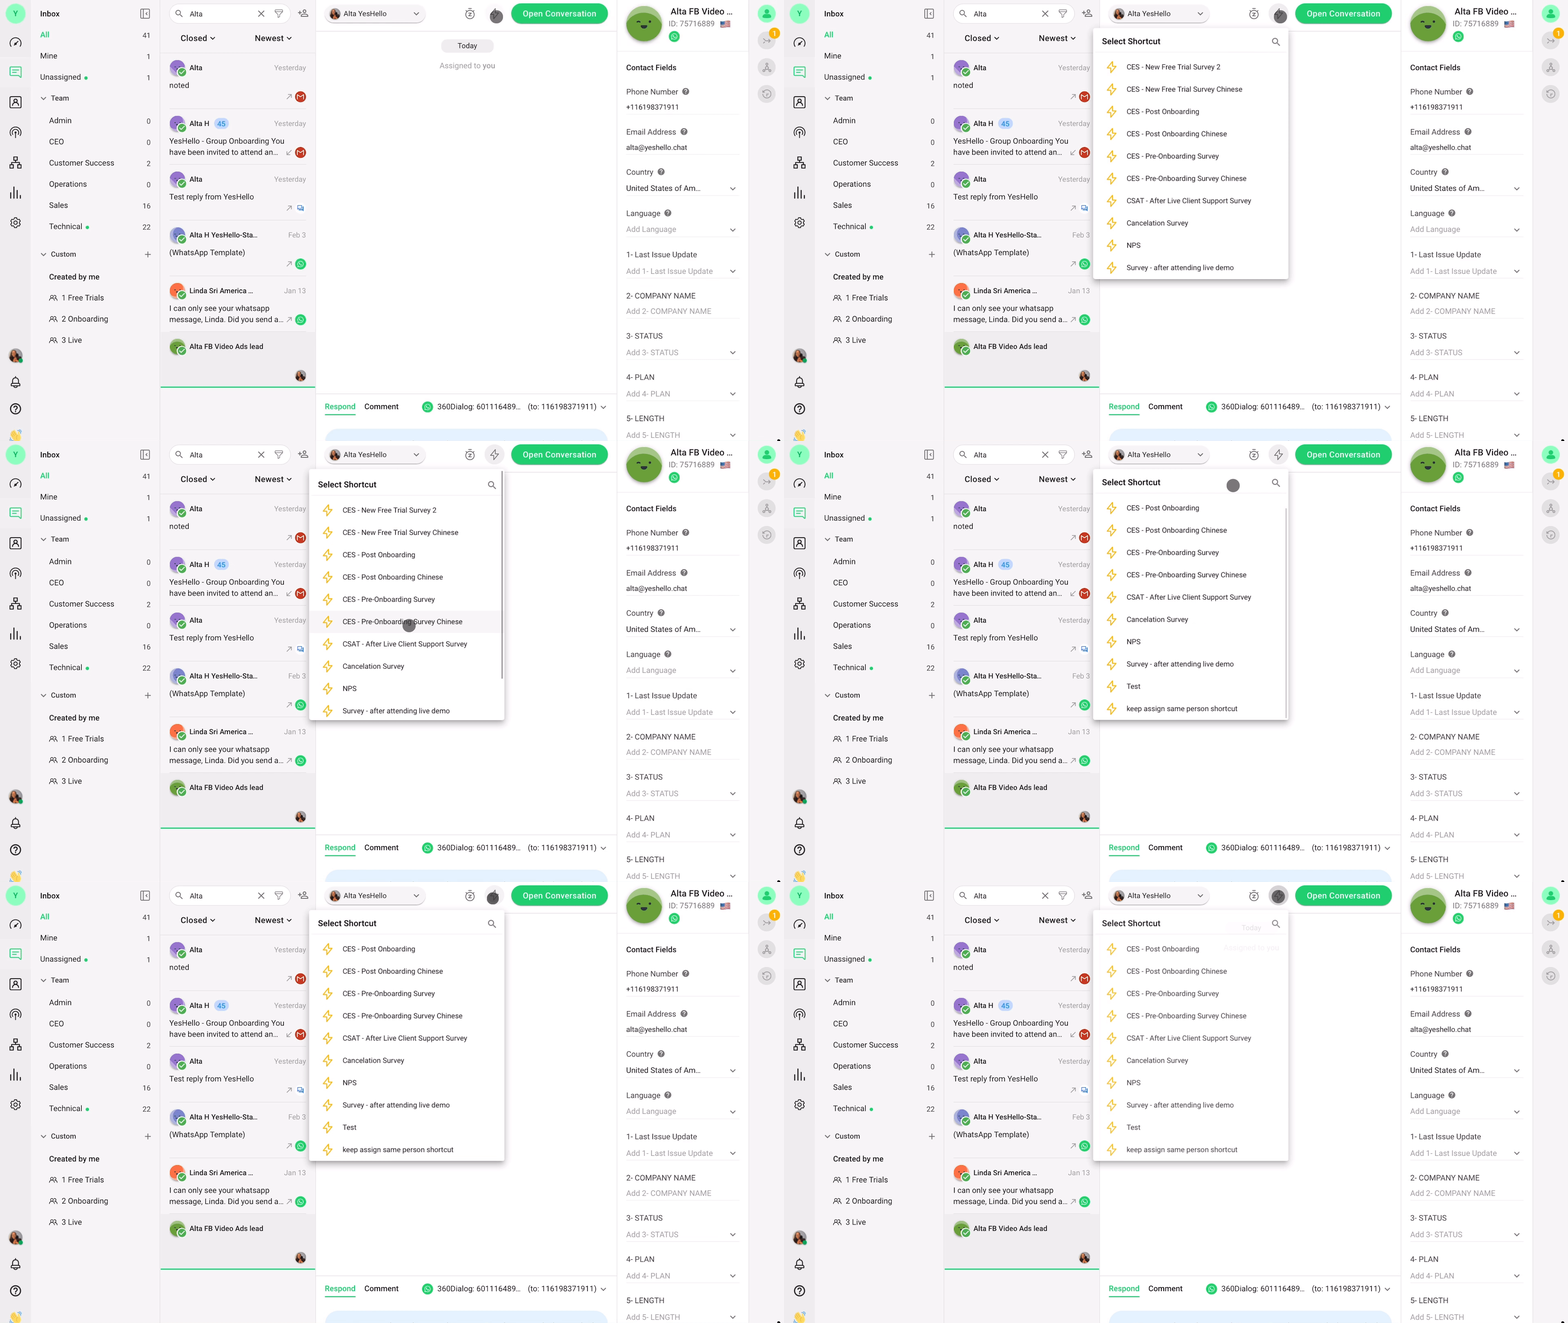
Trigger Shortcuts for Closed Conversations ⚡️
The Shortcut button has been moved to the top of the screen, making it easier to trigger shortcuts even when the message composer is blocked.
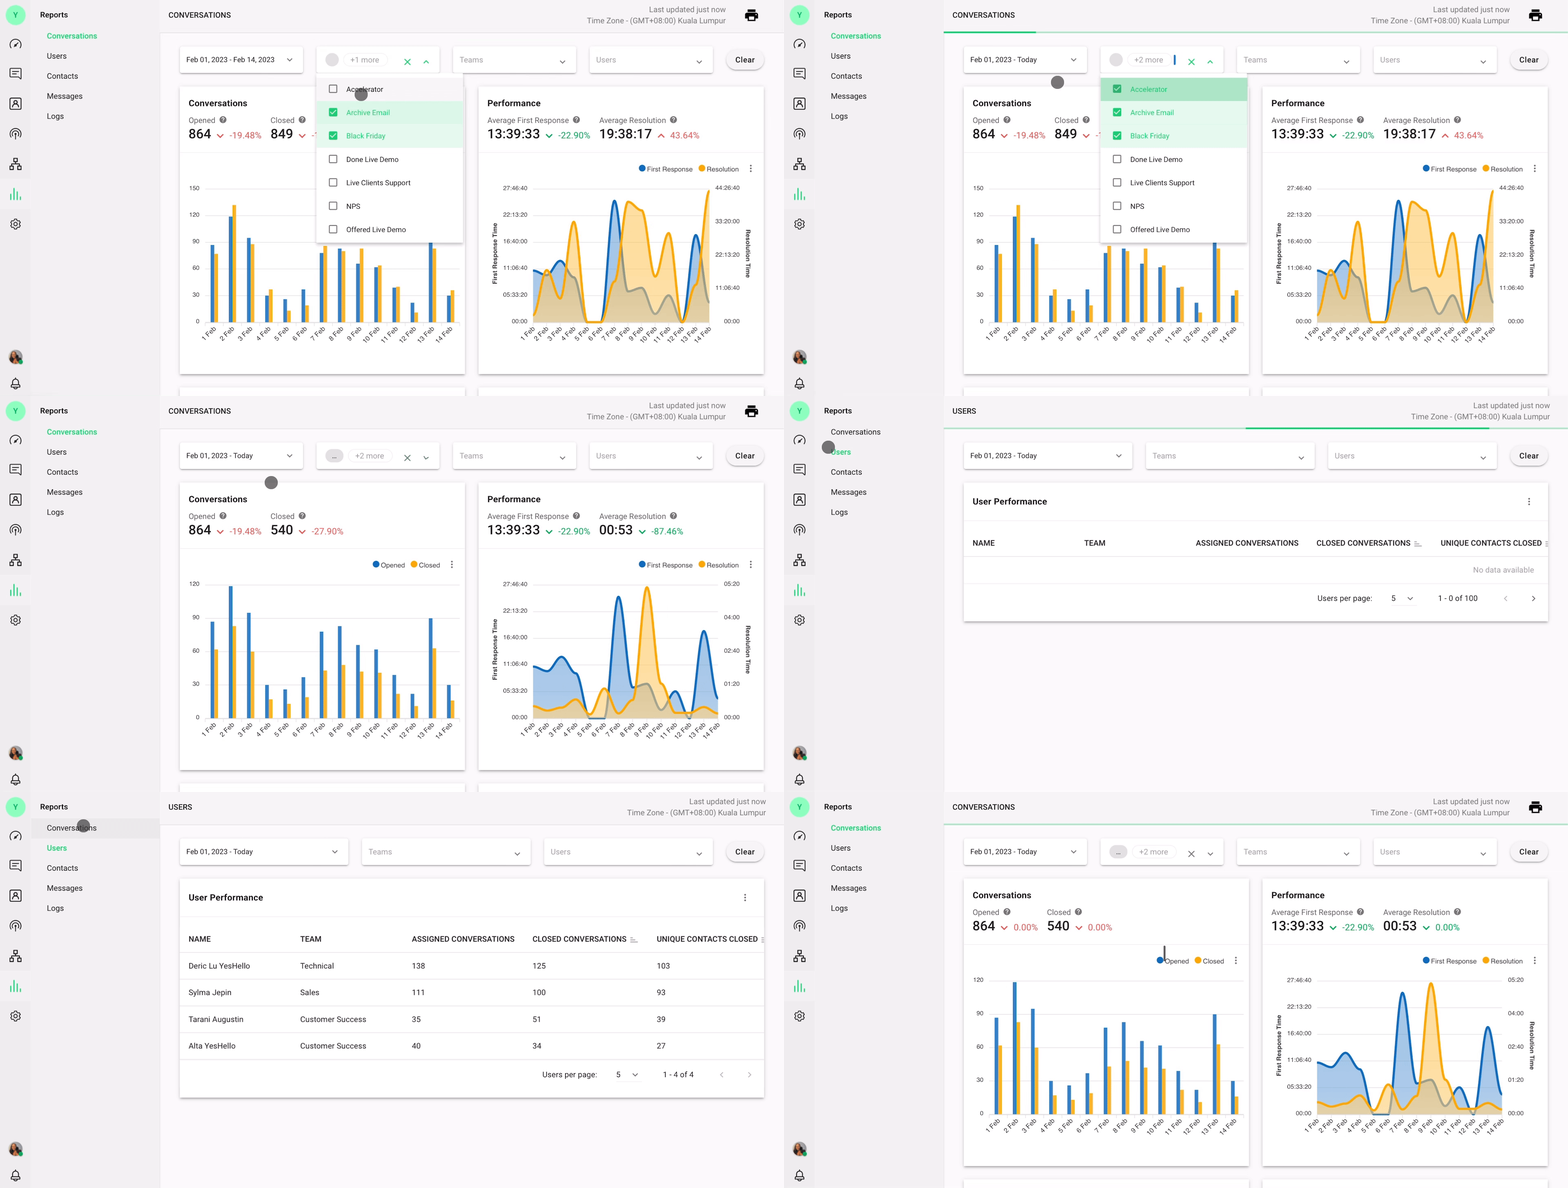
Retain your Last Used Filters in Reports
No more starting from scratch! Filters applied in reports will now be retained, so you can continue with your preferred filter configuration.
Google Business Messages is now a supported messaging channel on YesHello. 🥳
This allows customers to reach you through multiple entry points, including Google Search, Google Ads and Google Maps.
Customers who land at these touchpoints can message you directly from the same page to make reservations, inquire about product availability, check opening hours during holidays and more.
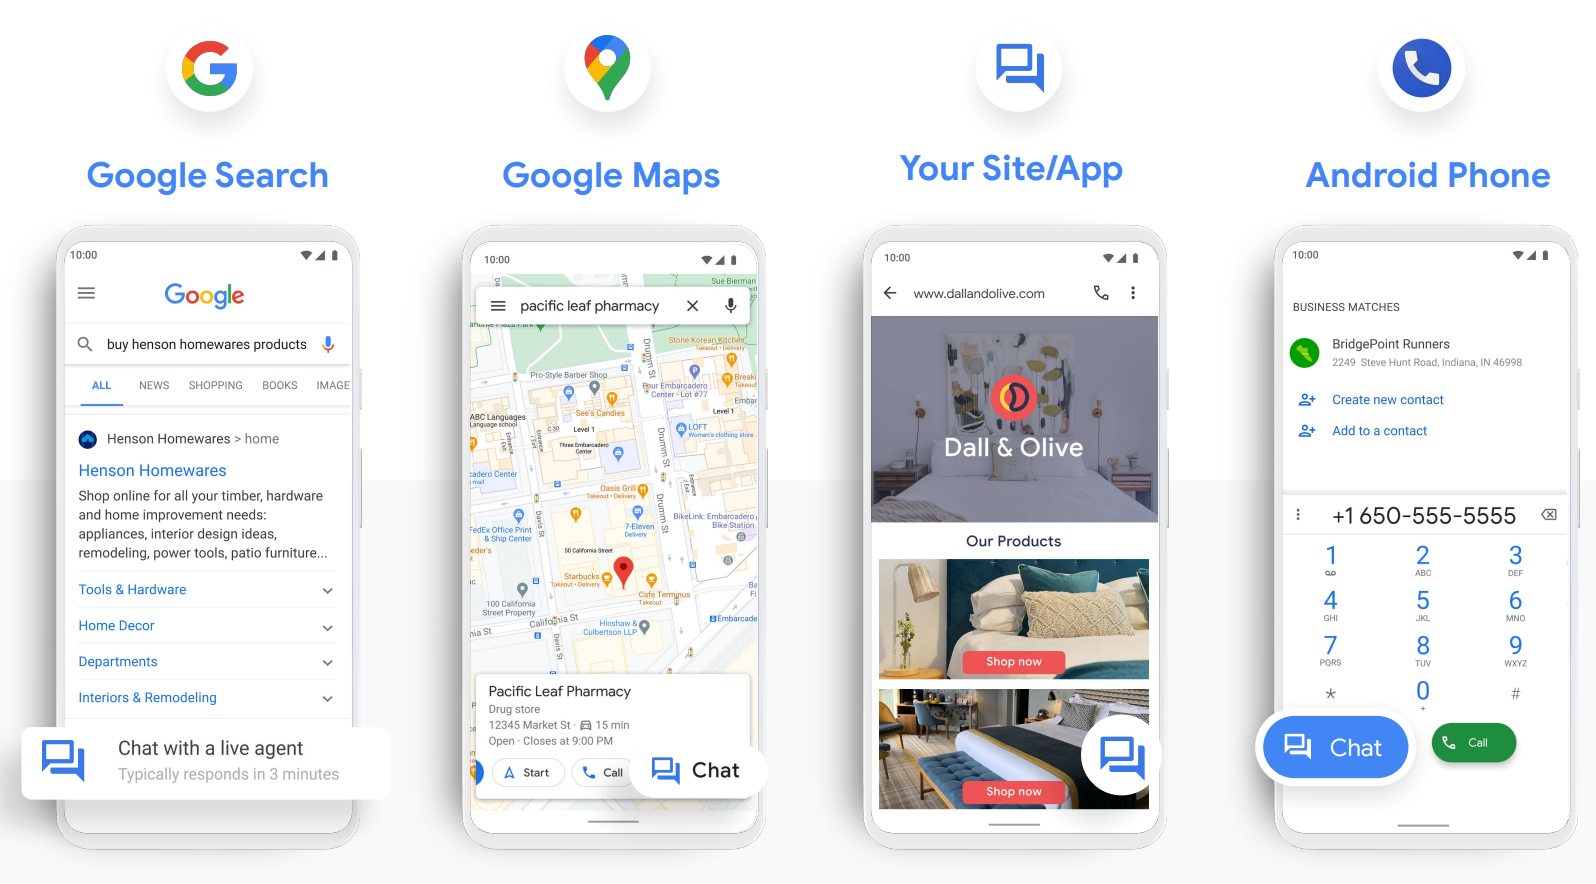
To get started, create a Google Business Profile. Then, connect your Google Business Profile to YesHello to start receiving and responding to messages in your YesHello inbox.
You can even add Google Business Messages as a standalone widget or as a channel in the multichannel widget on your website.
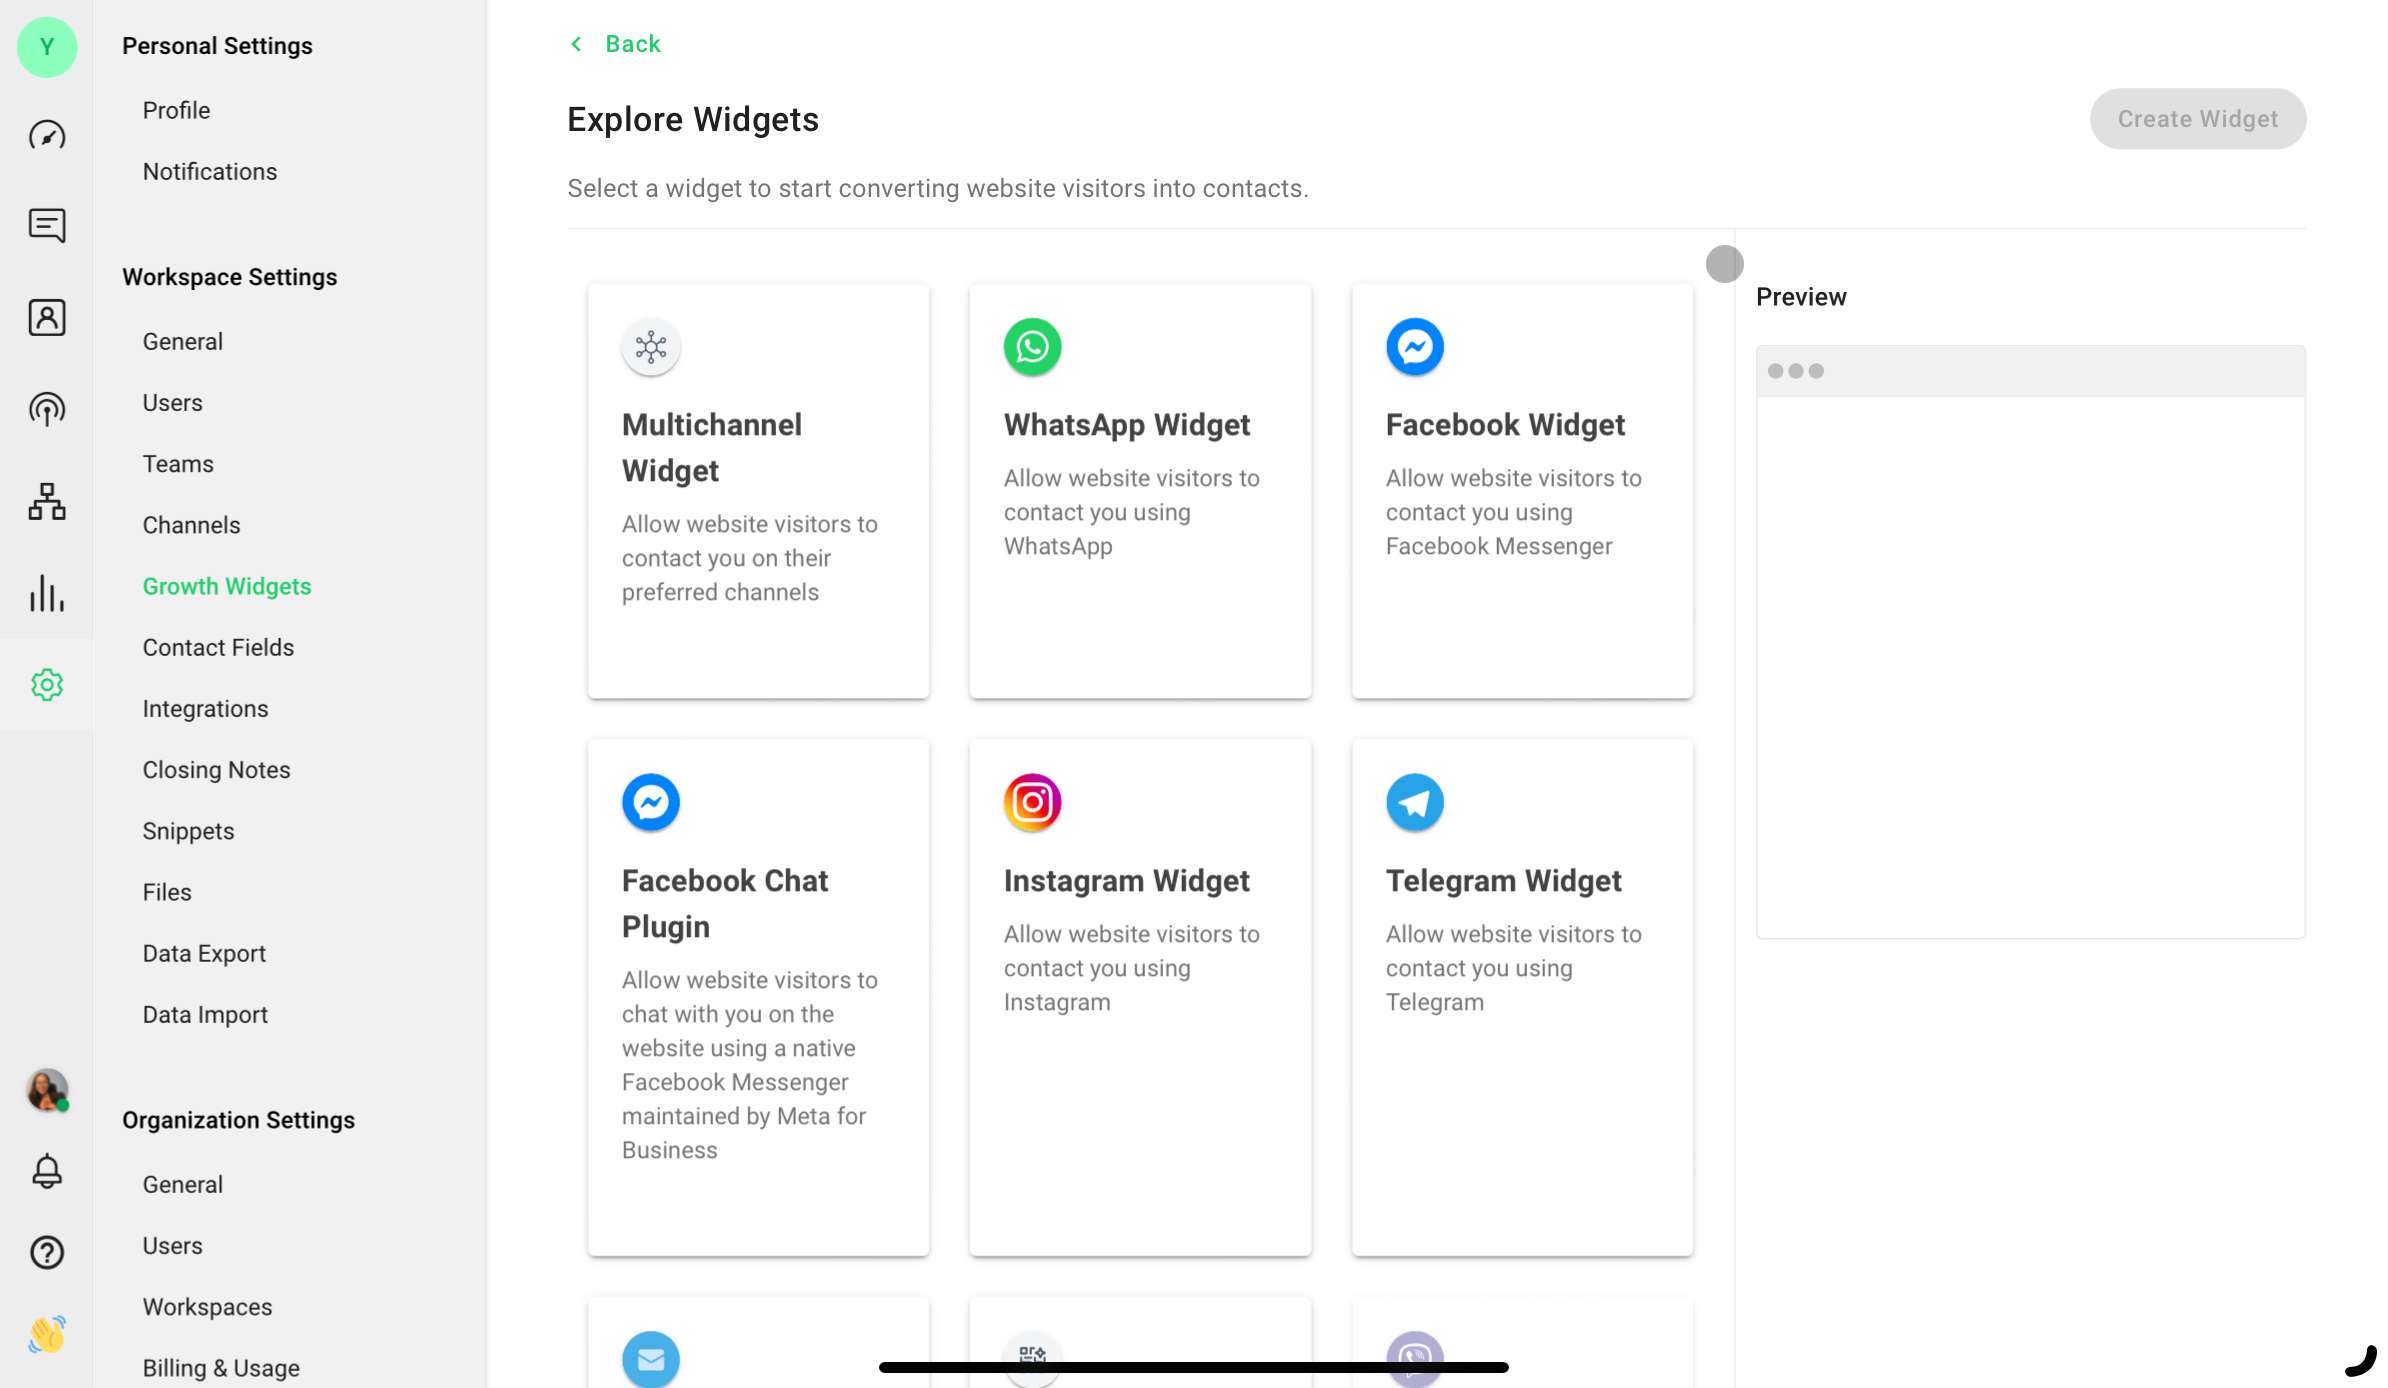
Other supported functionalities for Google Business Messages include Workflows automation, Dialogflow, Zapier 2.0 and API 2.0.
Feel free to contact our support team if you have any questions about connecting Google Business Messages to YesHello.
YesHello’s Workflows receives a powerful upgrade: The ability to trigger Workflows externally via webhooks.
Previously, Workflows could only be triggered by events within the YesHello platform, such as new conversations or Contact Tag updates. Now, two-way integration allows Workflows to be triggered by events in external applications like CRMs or Shopify through incoming webhooks (HTTP POST requests).
In short, Workflows can be triggered internally or externally to sync information between platforms, prompt actions on YesHello or send messages about events on third-party platforms. For instance, updating a contact’s information on Hubspot could trigger a Workflow to update their profile on YesHello.
Let’s check out the new feature.
New Workflow Trigger: Incoming Webhook
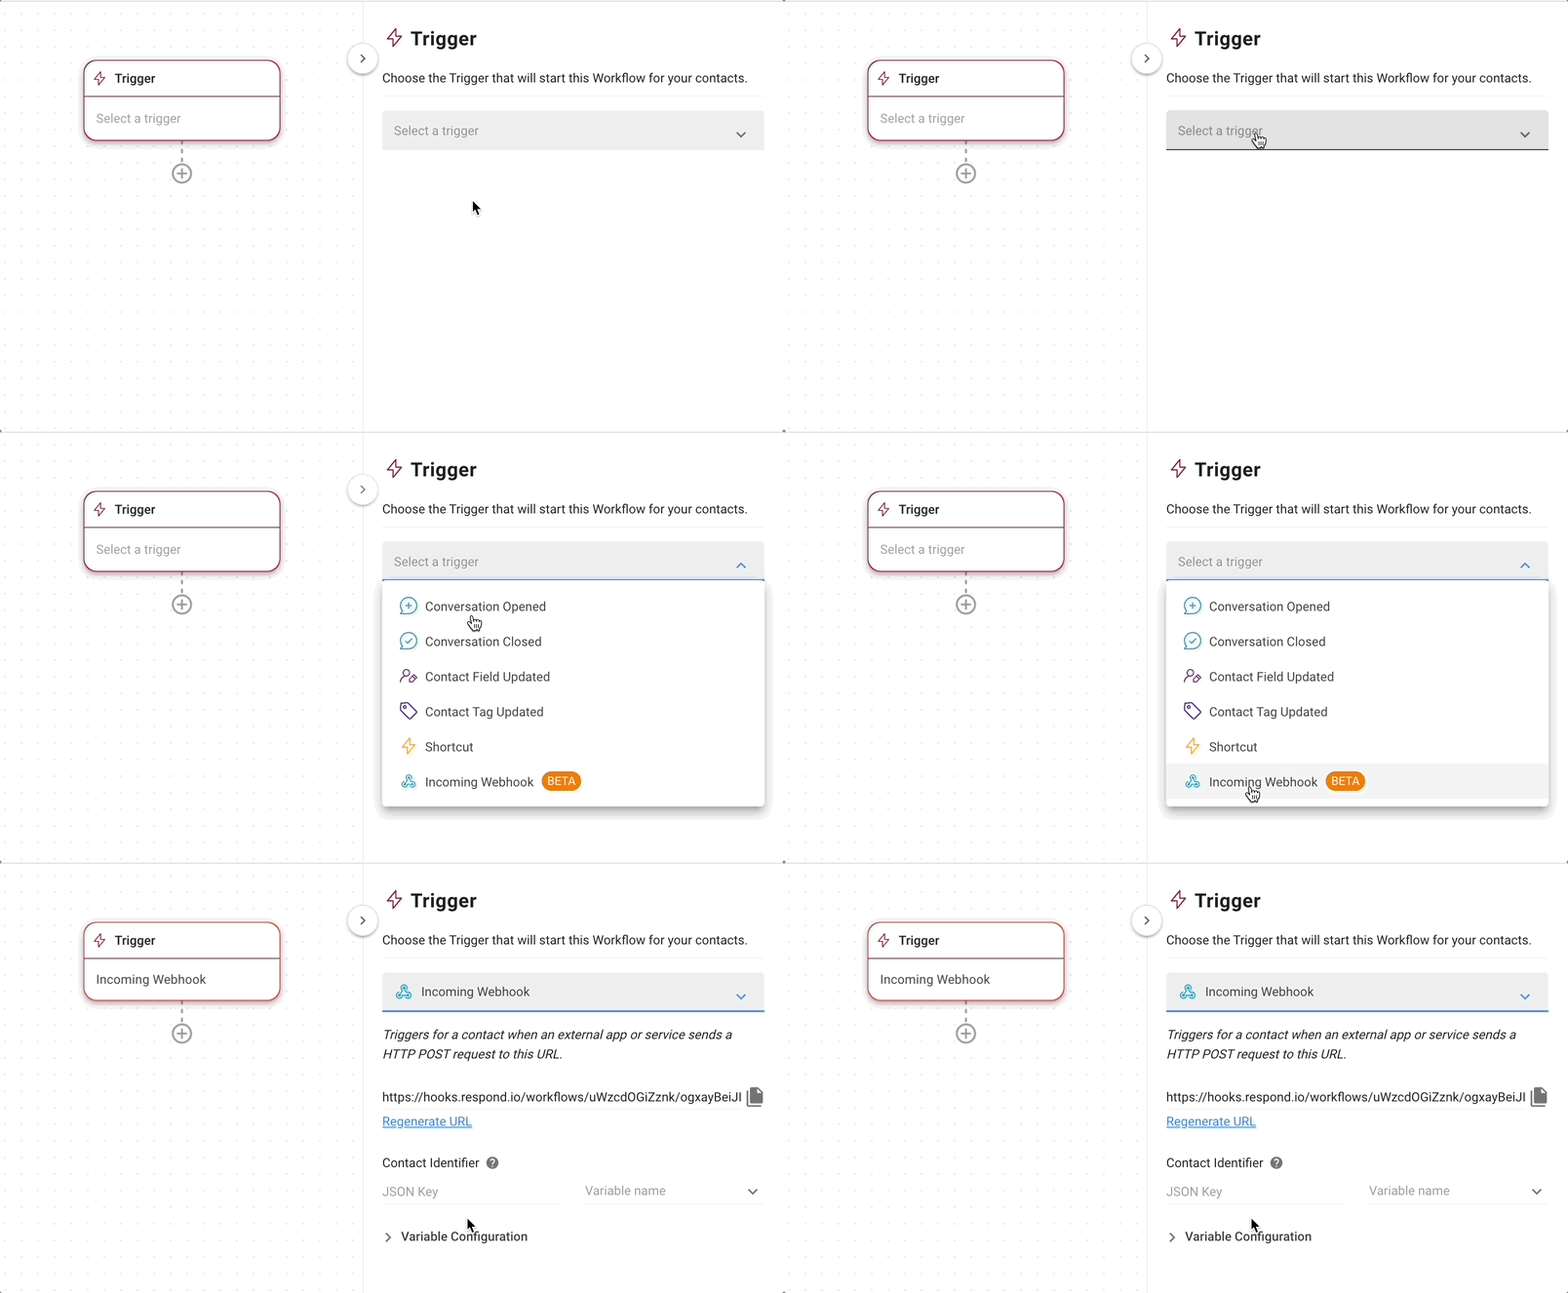
Design Workflows that can be triggered by external events with the new Incoming Webhook Trigger. Follow the below steps to set and configure this Trigger.
- Create a new Workflow. Select Incoming Webhook as the Trigger in the dropdown menu.
- Copy the automatically generated URL and paste it in the external application or platform to enable HTTP POST requests to YesHello.
- Configure the contact identifier to determine which YesHello Contact(s) will go through the Workflow. This ensures the contact in the external application and the contact on YesHello are the same person. Identifiers include email, phone number or YesHello Contact ID.
- Build your desired Workflow.
Save Information Passed in the Workflow as Variables
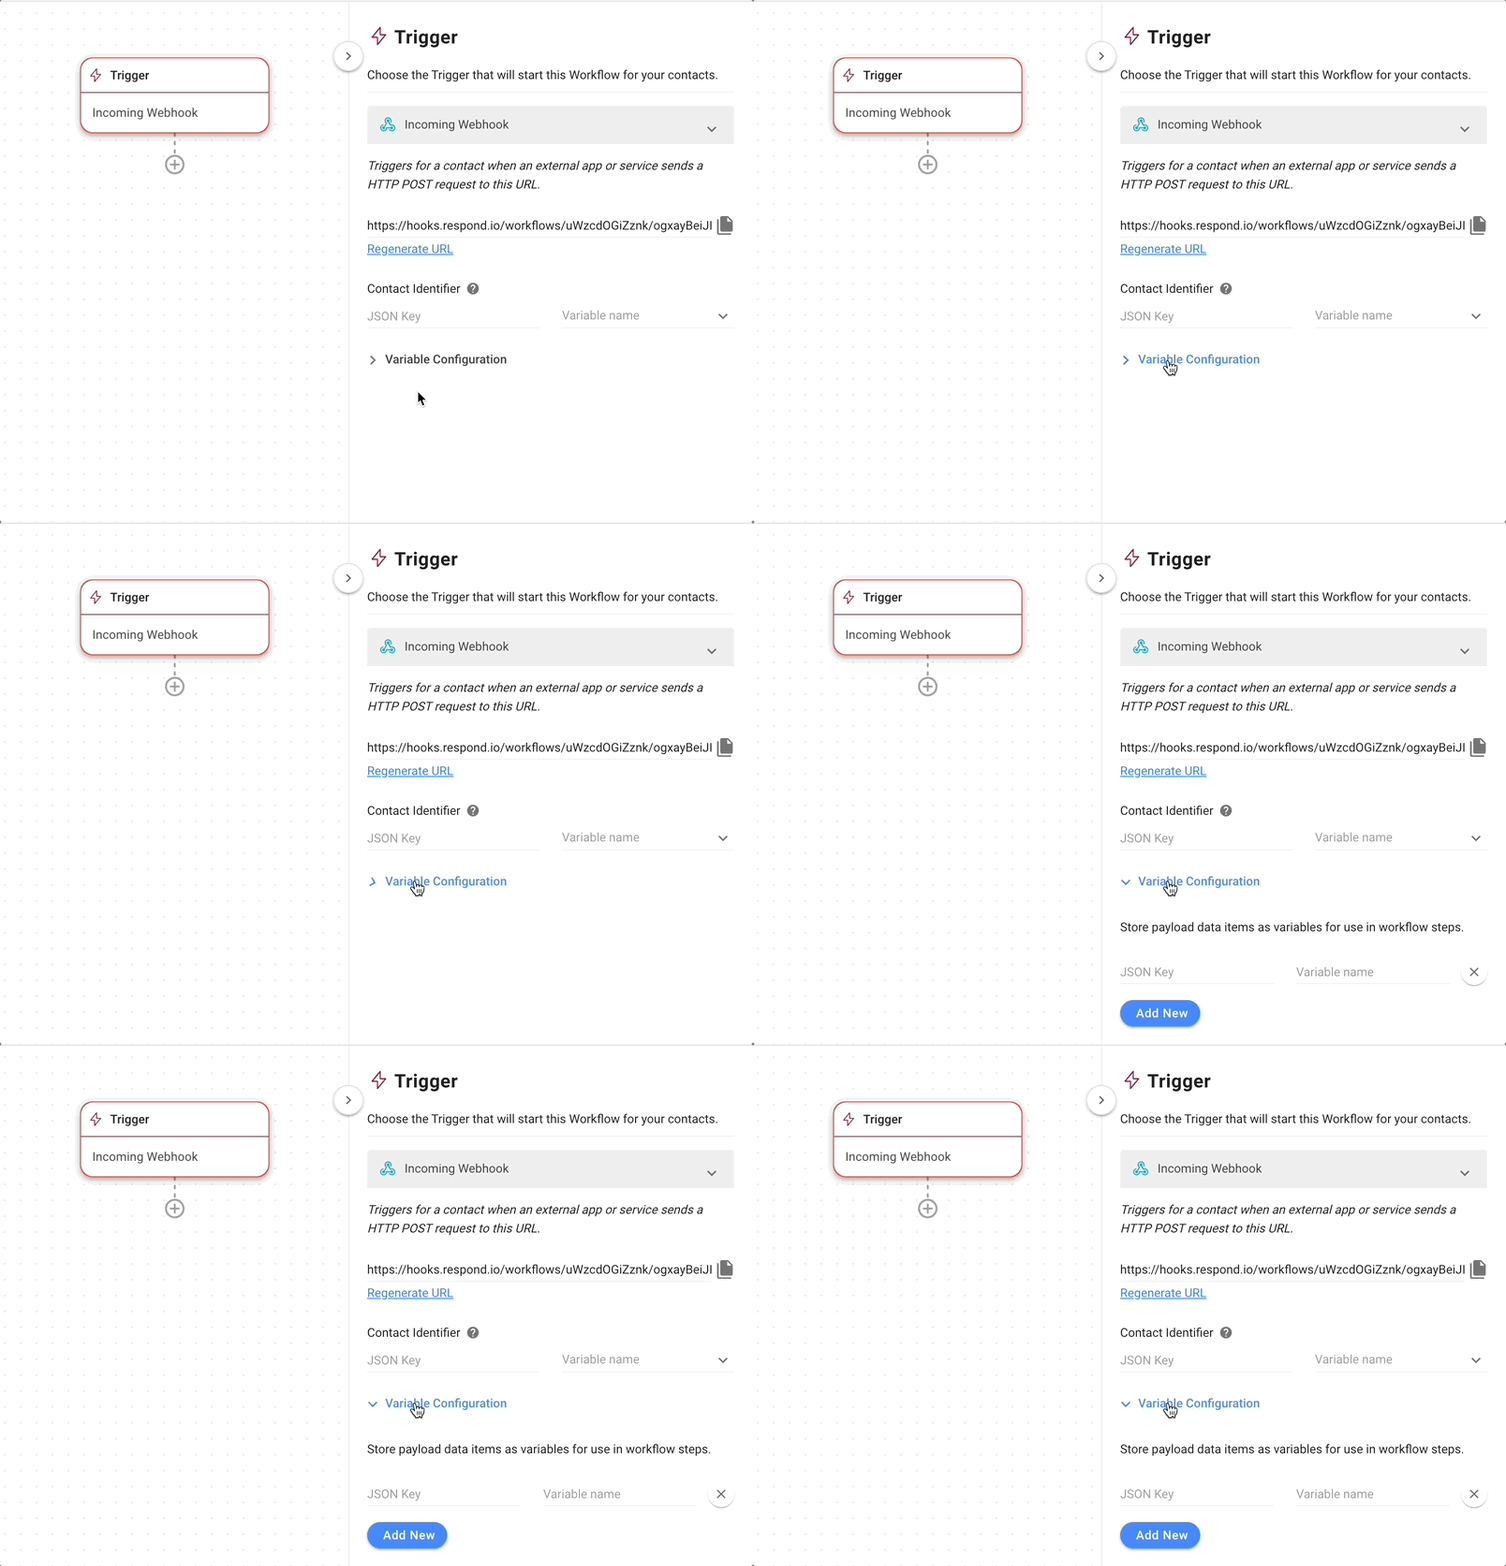
You can also store payload data items in the incoming webhook as variables to be used in the Workflow.
For example, create an order confirmation Workflow that saves order numbers on Shopify as variables. When customers make a purchase, the Workflow will send them a confirmation message with the order number.
The new and improved Zapier integration is now available! 🥳 Here’s your ticket to building more comprehensive automation with over 5,000 applications. Updates include more triggers and a host of actions on the application or YesHello for more intuitive use.
To get the new version of the Zapier integration, go to Settings > Integration > Zapier. Generate an API key that will authenticate your Zapier account with YesHello.
Previously, the Zapier integration only supported two triggers: New contact created and New or Updated Custom Field. The range of new triggers makes a variety of use cases possible:
- New incoming or outgoing message
- Conversation opened or closed
- New contact is added
- Existing contact is updated
- Contact tag is updated
- Contact assignee is updated
- New comment is added for a Contact
- New actions
In a similar fashion, the legacy Zapier integration did not allow for any actions to be performed. The new integration supports a host of actions to choose from, including:
- Create or update a contact
- Find a contact
- Delete a contact
- Send a message
- Add a comment
- Add or remove a tag
- Update assignee
- Update conversation status
- And many more!
Keep an eye out for the YesHello Zapier templates coming soon to help you get started with popular applications such as Hubspot, Shopify, Magento, Salesforce and Pipedrive among others.
YesHello’s legacy Zapier integration will be deprecated on 22nd of March.
Fret not, existing users — Zaps that currently use the legacy Zapier integration will continue to run until the deprecation date. To ensure no disruption to your workflows, we encourage you to update all existing Zaps to access the new triggers and actions.
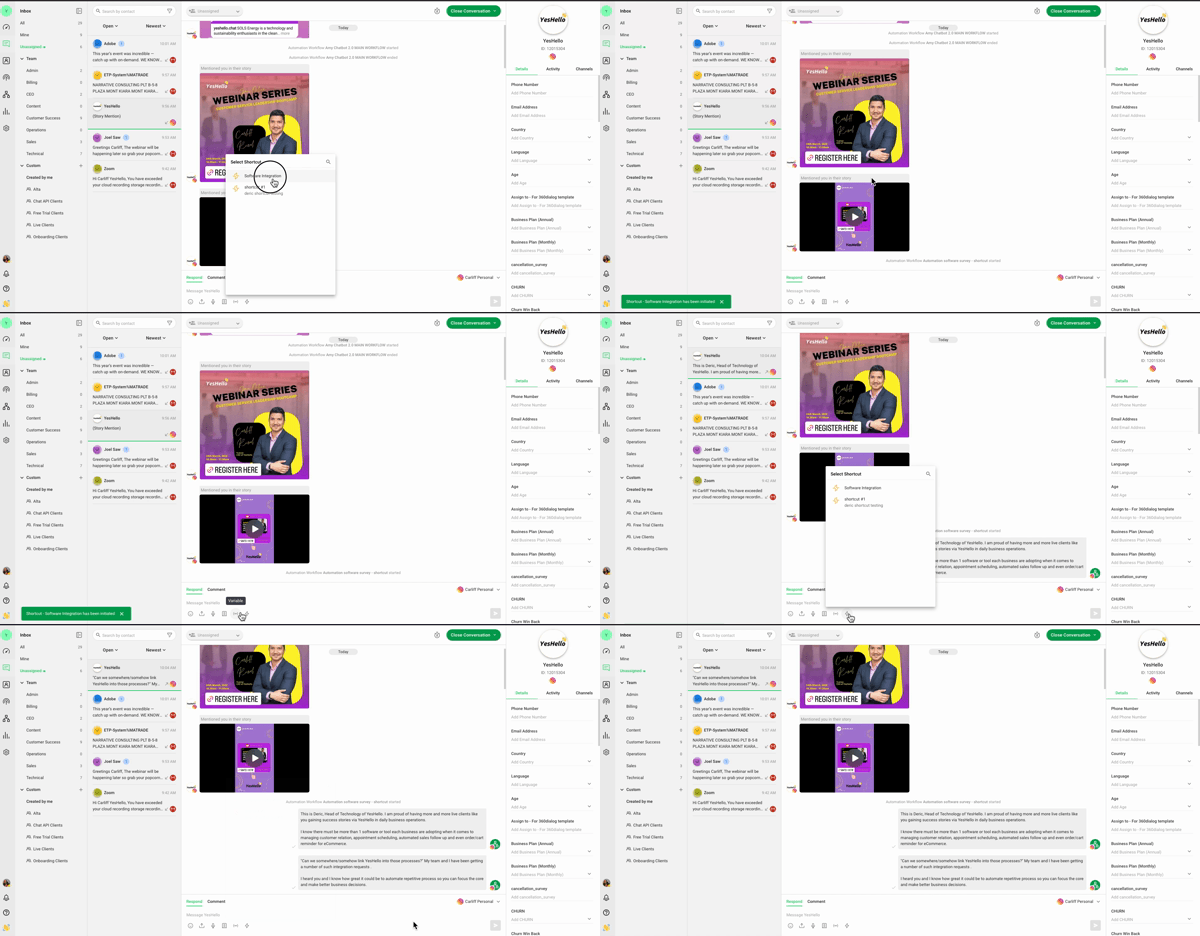
This time around we have a fast release with several valuable improvements. You’re going to be thrilled about our headlining feature: Shortcuts!
So, what is a Shortcut and what can you do with one?
[New] Shortcuts
A Shortcut is a Workflow that has been created with the newly-introduced Shortcut trigger. It can be initiated in the Messages Modules, allowing platform users to launch Workflows during conversations with Contacts without leaving the module.
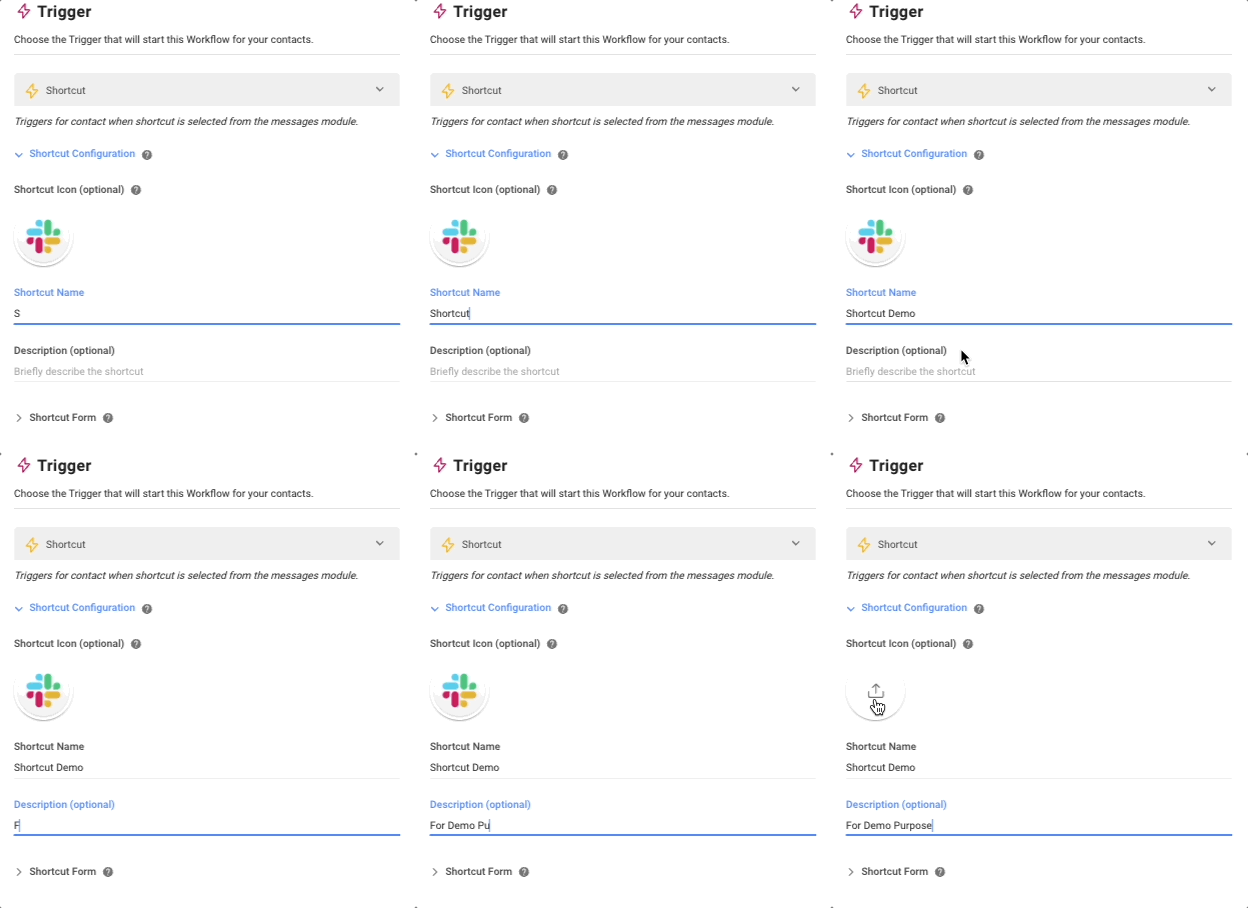
When creating a Workflow with ‘Shortcut’ set as a trigger, provide a name and description for each Shortcut, as well as personalize them with icons. All the provided information will be displayed in the Shortcut menu so you can quickly distinguish between Shortcuts and their purposes to select your desired Workflow.
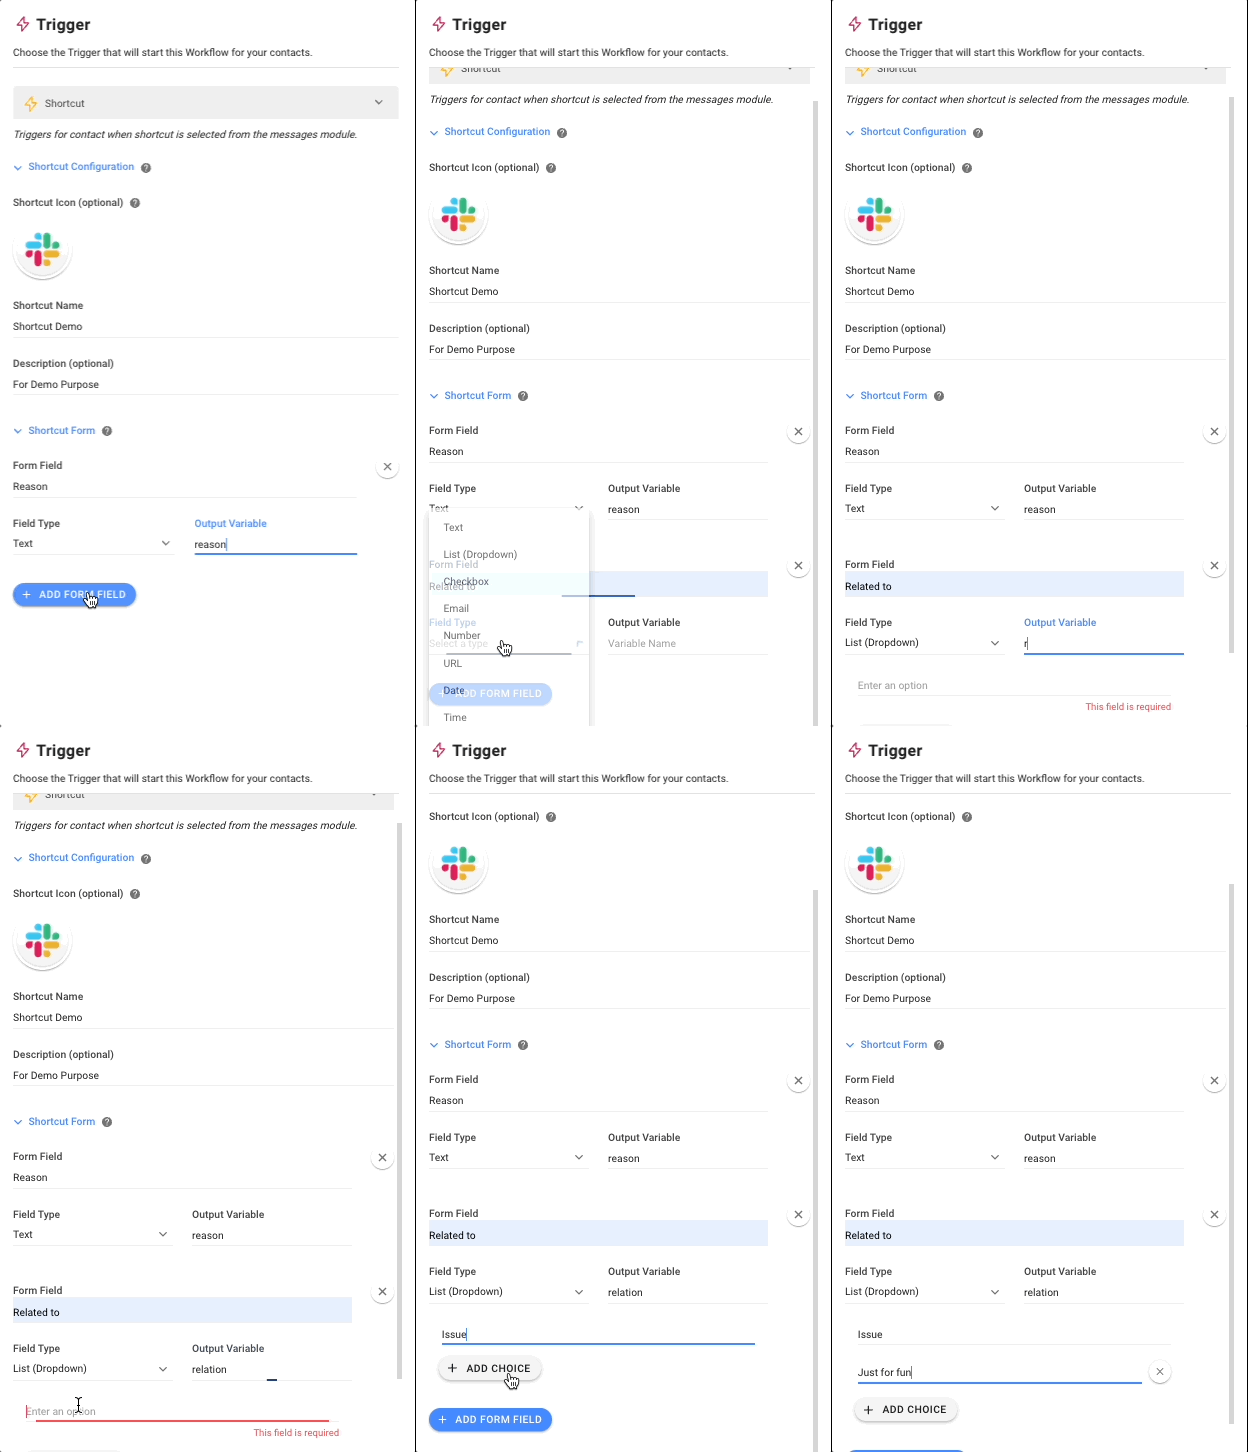
Sounds cool? That’s just a fraction of what you can do with this feature. For instance, you can create customizable Shortcut forms that are prompted whenever the Shortcut is triggered. Users can input data or comments that will be reflected in the Workflow. Use custom fields in the forms to obtain everything from Order IDs to reasons for refunds or product exchanges.
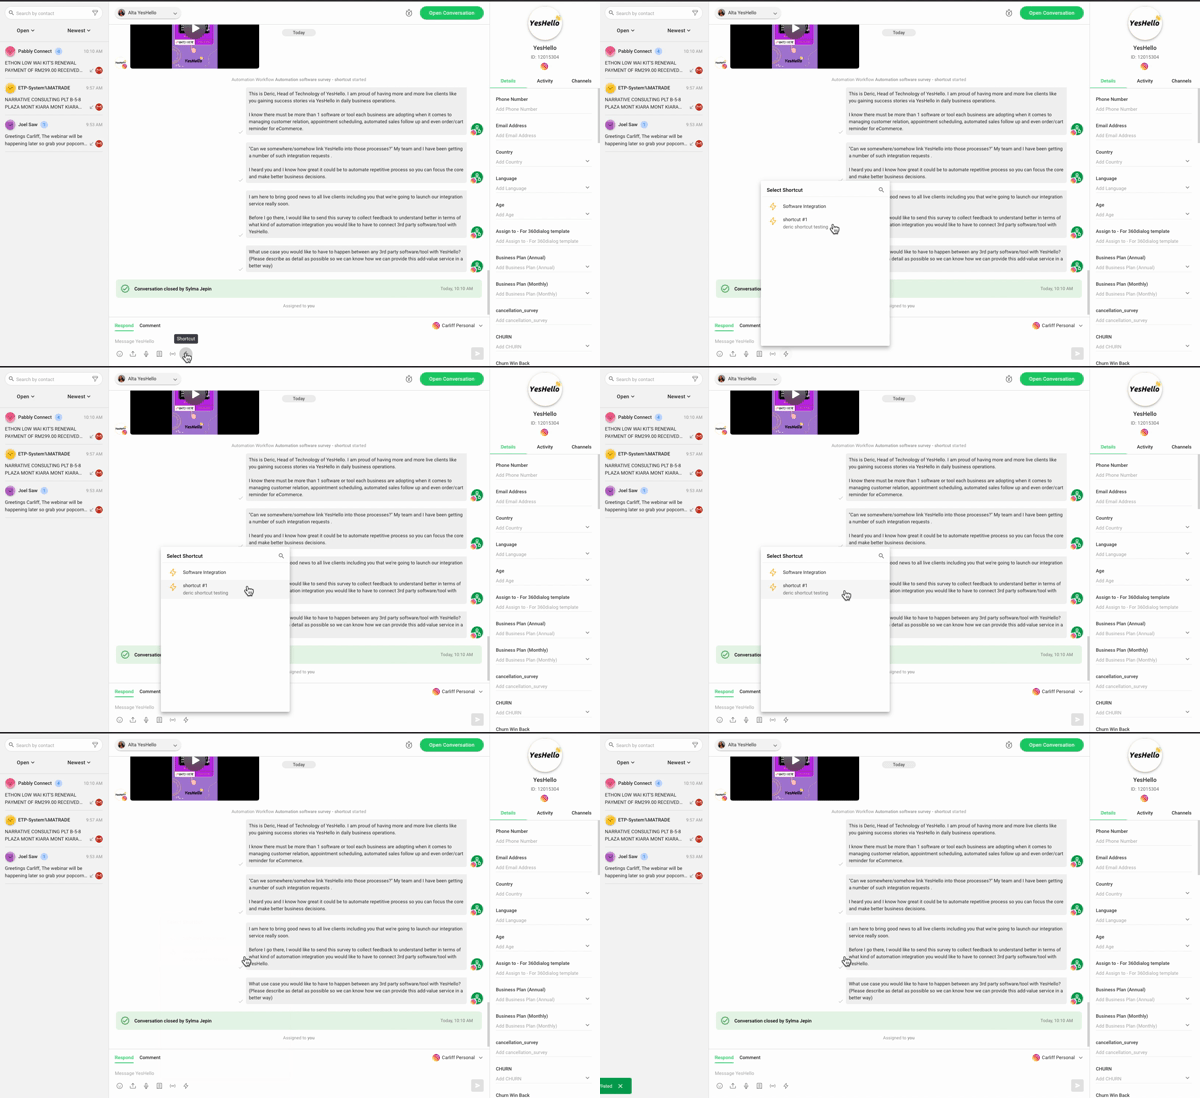
Can you imagine how powerful and flexible Shortcuts is? You can build an escalation process for agents, a refund process for customers, and so much more.
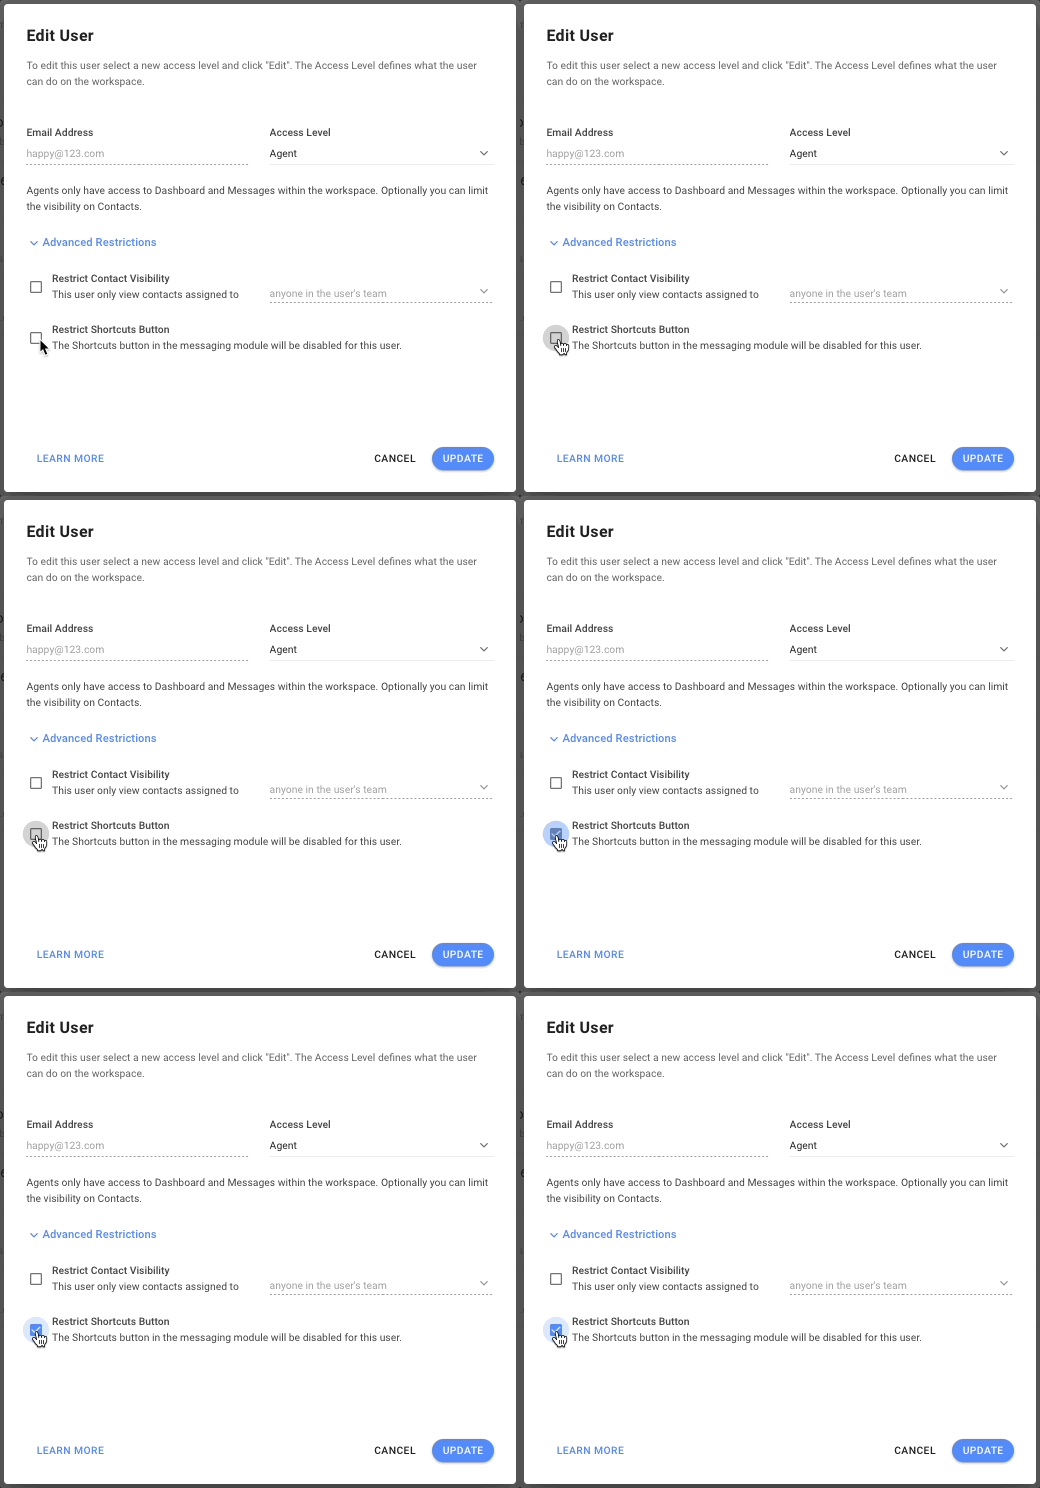
As it’s such an advanced feature, perhaps you want Shortcuts access to be restricted only for use by Managers and Owners. We’ve got you covered with advanced restriction settings in the Workspace User Settings that allow you to disable the Shortcuts button for Agents.
Let’s look at another new feature.
[New] Trigger Variables for Conversation Closed Trigger
Say you want to regularly send Conversation data to your own data warehouse. Exporting data manually from Reports module is awfully time-consuming. To ease your workload, you can now use trigger variables!
Trigger variables are variables that are tied to a specific trigger. In this case, we’ve added them to the Conversation Closed trigger.
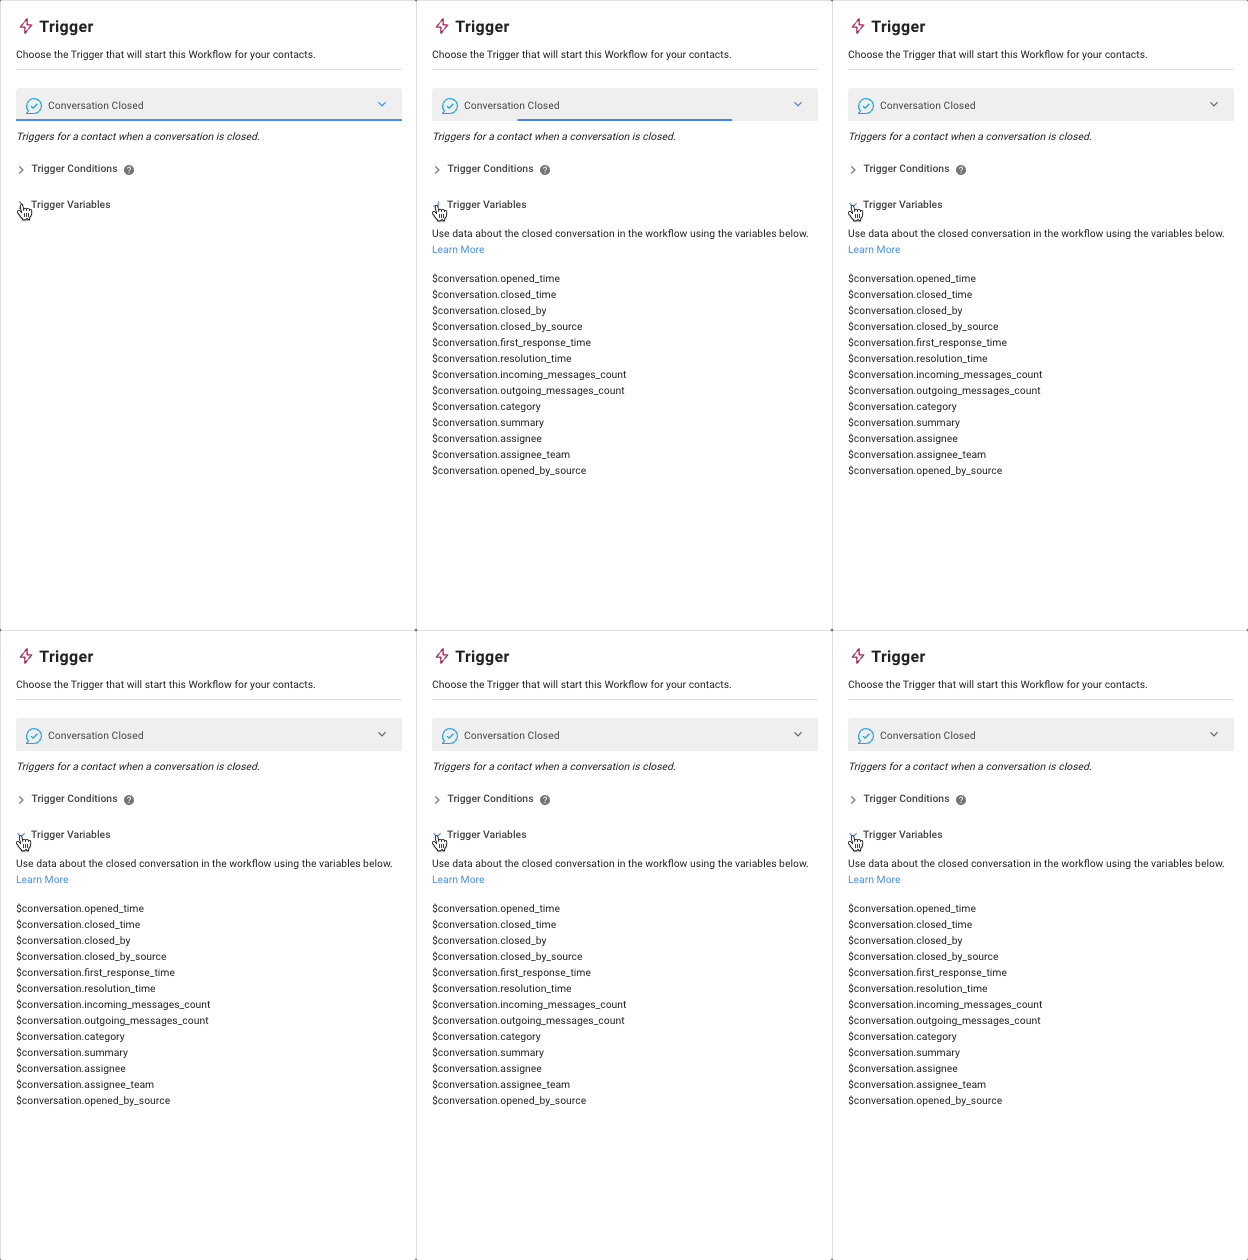
Here is a list of trigger variables that are now available for the Closed Conversation trigger. They reflect data related to the conversation that has been closed.
$conversation.opened_time
$conversation.opened_by_source
$conversation.closed_time
$conversation.closed_by
$conversation.closed_by_source
$conversation.first_response_time
$conversation.resolution_time
$conversation.incoming_messages_count
$conversation.outgoing_messages_count
$conversation.category
$conversation.summary
$conversation.assignee
$conversation.assignee_team
Read more about trigger variables here.
[New] Workflow Branch Conditions - Time Since Last Outgoing Message and Assignee Status
When you log in feature requests, you aren’t just sending out wishes into a void. We hear you, and we act on them! You wanted more branch conditions and we are delivering.
Similar to the Time Since Last Incoming Message condition, we now have a Time Since Last Outgoing Message option. You can incorporate this into a Workflow to create an action based on the time since you last sent a message to a Contact.
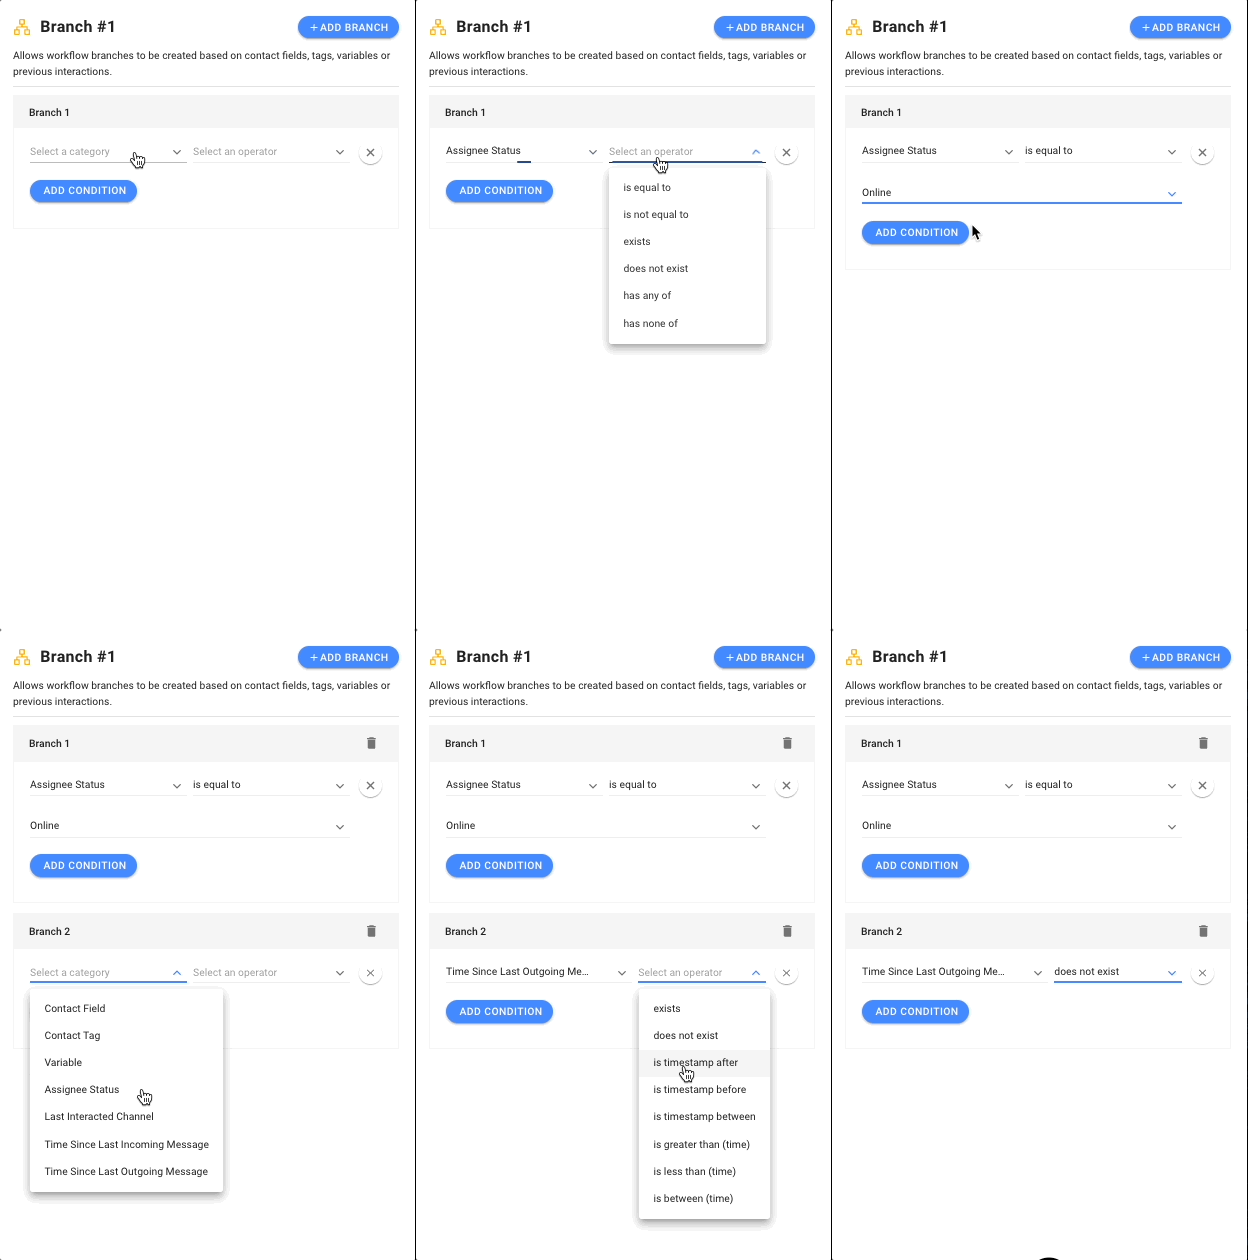
Another request was for an Assignee Status branch condition, so you can create different actions for Contacts depending on the status of the agents they have been assigned to (Online, Busy or Offline). Talk about fine attention to detail for customer care.
[Improved] Website Chat - Identify Logged-In User
We’ve made a major improvement to our Website Chat that’s going to make customer conversations on the channel more seamless than ever.
Users who are logged in to your platform and message you on the embedded Website Chat will no longer have to fill up a pre-chat form. Instead, they can be instantly identified by their user details. Read more about this here.
Here are some minor but mighty tweaks we’ve made across the platform:
Upgraded Vonage Messages API Version 1.0
Good news for Vonage users! Vonage has finally released a new version of WhatsApp API, which means it will support WhatsApp Interactive Messages. Use interactive features like Lists and Quick Reply buttons in messages to your Vonage contacts.
New assignee variable: $assignee.team
You can now also refer to an assignee team, instead of only individual team members. The value of the $assignee.team variable is the name of the assignee’s team.
Enhanced connection to other email providers
We now accept non-emails as usernames for an SMTP server. You can now connect to other email service providers such as Mailjet, Mailgun and so on.
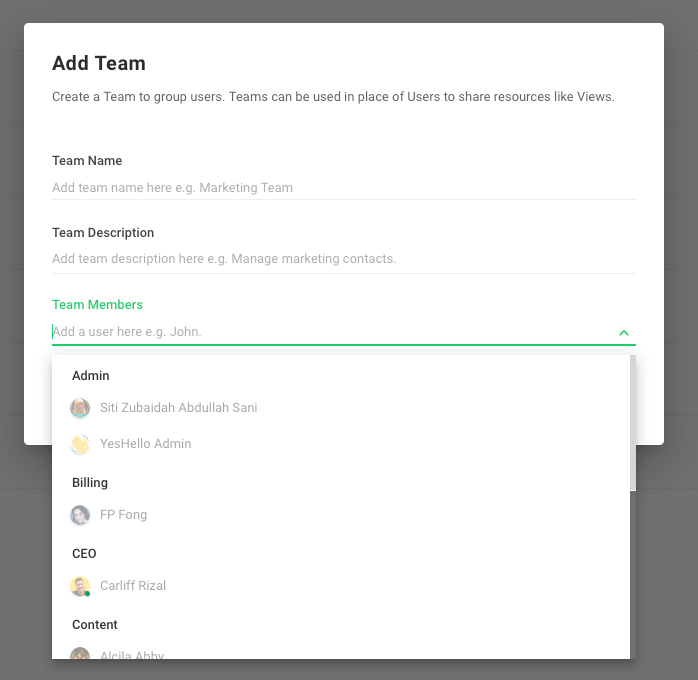
Enhanced team member drop-down in Add Team/ Edit Team dialog
We used to list users without grouping them by teams, with no way to know which team anyone belonged to. Identifying teams and their members is now a breeze with the new presentation.
Sound notifications for New Contact assigned to me
Yes, we have worked on this! If a Contact is assigned to you manually or automatically via Workflows, you will now receive a sound notification.
And many more:
- Standardized the time format in the Reports Module to HH:MM:SS
- Conversation events in the message window of the Messages Module are more subtly displayed now
- Two more operators have been added to fields that use multi-value operators. The operators ‘Exist’ and ‘Does not Exist’ are now supported in the Tag filter in both Workflows and Custom Inboxes.
- Descriptions have been added to all Workflow Triggers
- Automations and Surveys have been deprecated. Do note that all scheduled Broadcasts that contain Surveys will not be sent as the contents are no longer supported.
Drum roll..... for the first release of the year! 🎉
We’ve made tons of improvements on the platform, especially in the Messages Module. We have also completed a long-awaited feature that you’re going to love...
New Design and Features in the Messages Module
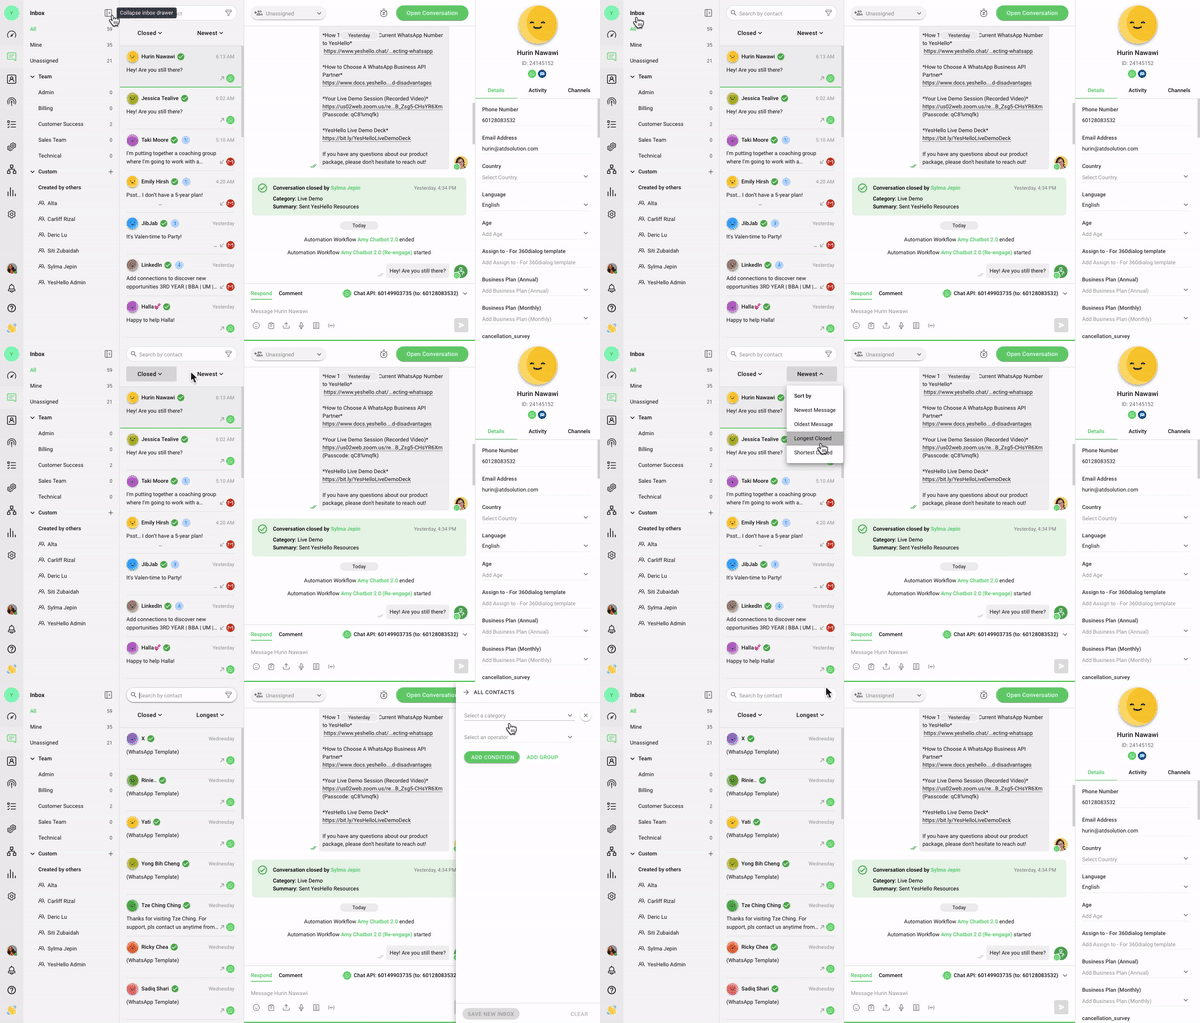
To welcome 2022 in style, we’ve redesigned one of your most frequently visited pages — the Messages Module 💬
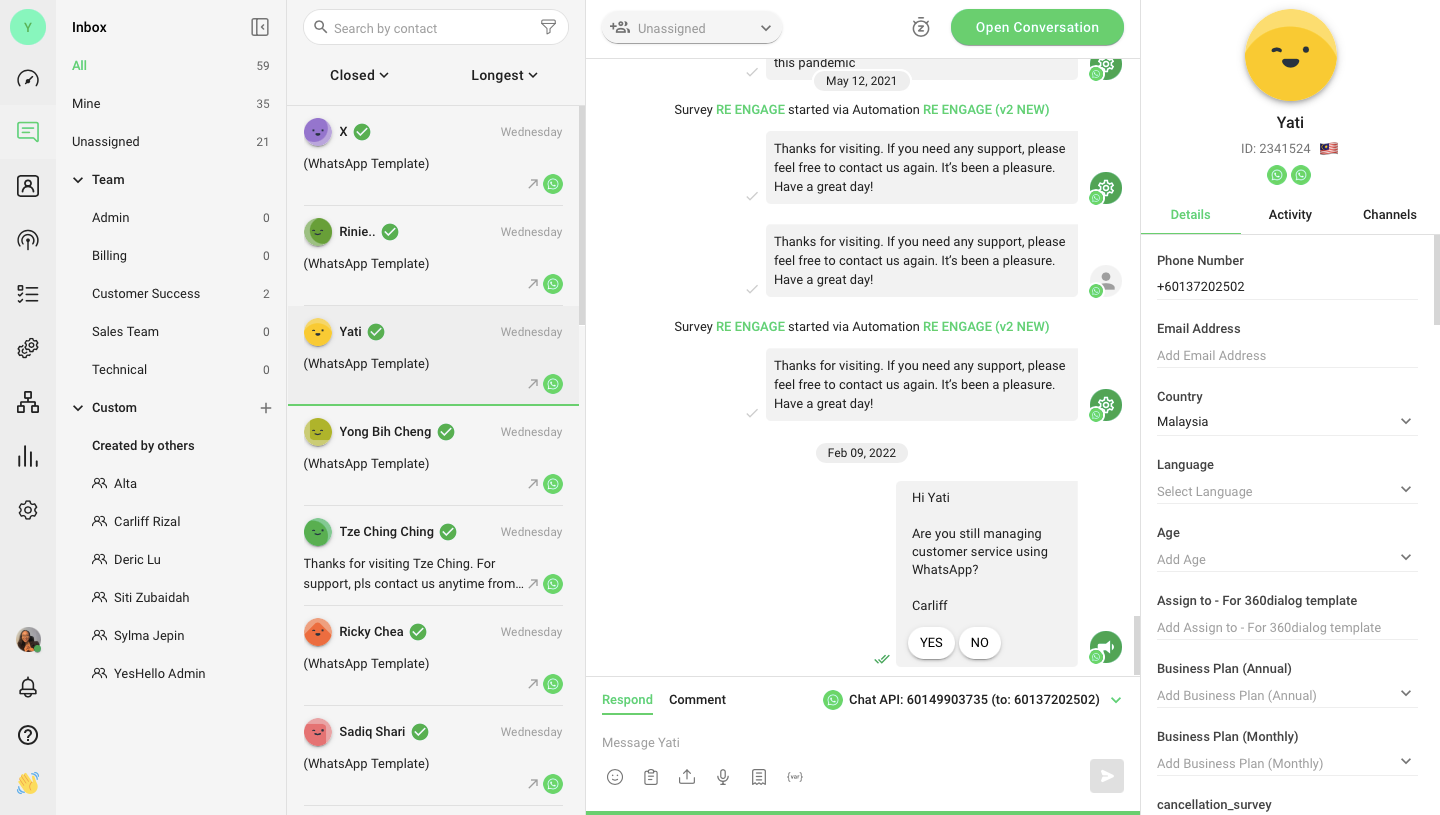
Let’s start with a quick tour of the new UI. First, we’ve built a collapsible Inbox panel on the left for you to access all your inboxes with a single click. Here you’ll find the new Team Inbox and an improved Custom Inbox with configurable access levels, designed to reduce noise for agents and ease supervision for Managers 😍
We’re also introducing more nuanced views of your Contact list with increased filtering and sorting options. And have you noticed that Contact profiles now have new avatars?
In short, the fresh layout of the Messages Module lets you do more with less effort than ever 😎 Check out more details on the highlight features of this new design ⬇️
[NEW] Team Inbox
Teamwork makes the dream work 🙌 We’ve enhanced your collective working experience by introducing Team Inboxes. Whenever a new team is created, a corresponding inbox will be added and all the Contacts assigned to team users will be listed in it for easy reference. Talk about leveling up your team’s game.
[IMPROVED] Custom Inbox
Another change is the renaming of “Views” to “Custom Inbox” to reflect the enhanced usability of this function. Advanced filtering capabilities give you complete control over how you see your messages. It even allows for nested conditions, so you can specify exactly which conversations pop up in your inbox 🤯 Tailor it to your needs, whether it’s to supervise new agents or monitor interactions with high-value Contacts. Owners, Managers and Agents can create their own Custom Inboxes, though only the first two can share them. How’s that for operational efficiency?
[NEW] New Message Indicator & Open Conversation Count
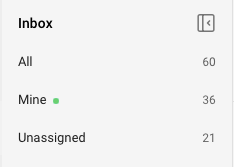
Are you seeing a little green dot 🟢 next to one of your inboxes? That means it’s time to check your messages. We know firsthand the importance of responding to customers in a timely manner — that’s what we’re all about! The New Message Indicator alerts you about incoming messages in real-time while our Open Conversation Count (the numerals by the side) lets you view at a glance the total number of open conversations in each inbox. This helps you know which inbox requires immediate or extra attention.
That’s it for the home tour. It’s time to invite your guests in and show them what you can do now 🥳
[NEW] Custom Channel 🙌
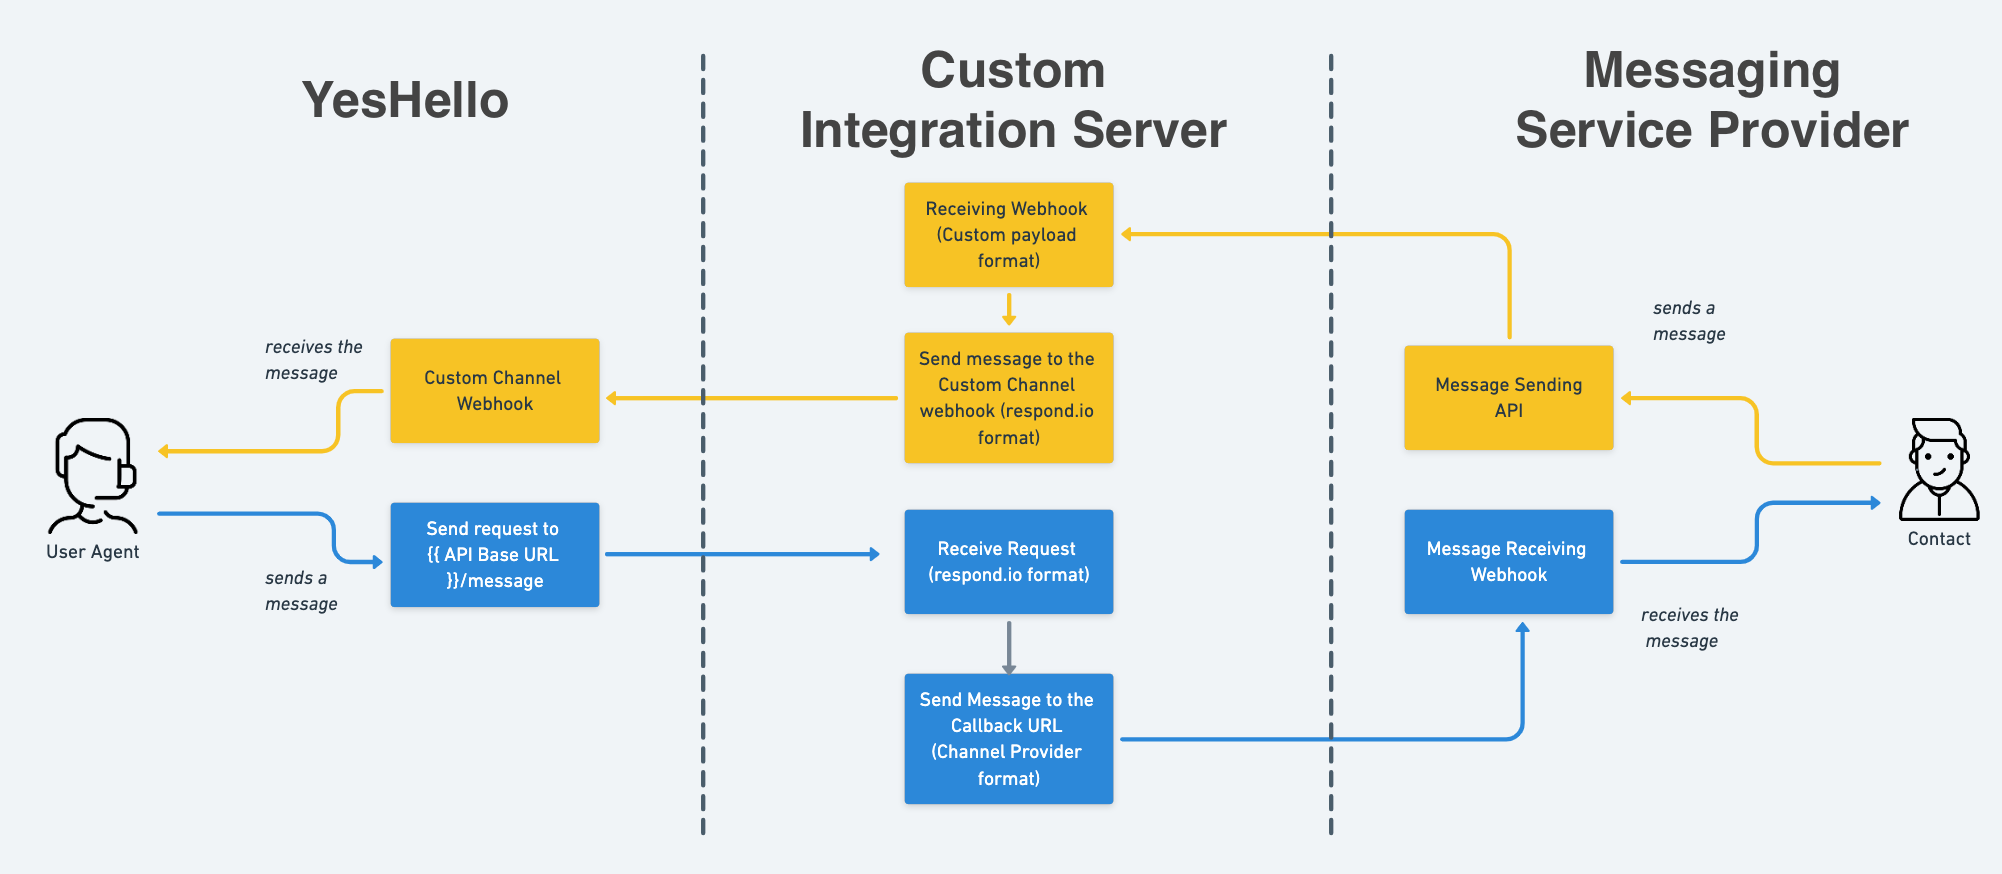
Special treat for ALL YesHello users: Integration with ANY yes, ANY!! third-party messaging channel is now possible 🎉 Our brand-new Custom Channel feature allows you to integrate any messaging channel with YesHello so you truly can handle all conversations on a single platform.
All you need is a Custom Integration Server to translate messages to YesHello's format and voila, it will work like any natively integrated channel.
Here’s a visual to give you an idea of the message flow:
Learn more about Custom Channel here!
What can we say, being YesHello user has definite perks!
[New] Relative Time for Date Operators
You wanted to know the elapsed time since an incoming message was received. We heard you loud and clear 👍 In addition to absolute time, date operators also now support relative time, applicable to all date-type custom fields. The new date operators are: “is greater than X time ago”, “is less than X time ago” and “is between X and Y time ago”. This means you can now create Workflows branch conditions such as “Time since last incoming message is greater than X seconds/minutes/hours/days ago” and build a Workflow that automatically closes conversations after a certain amount of time, for instance. You could also apply these operators in other modules to filter how you view messages or Contacts.
[New] New Send WhatsApp Message Template Icon
Judging by the demand, this is going to be popular! Previously, the WhatsApp Message Template option was only available after a messaging window closes. It’s now a permanent feature and is available even during conversations. Simply click on the WhatsApp Message Template icon at the bottom of the message composer and select the desired template 💬 This is the messaging shorthand you’ve been waiting for.

[New] System Variables
We have introduced a new type of dynamic variables - system variables! These include:
$system.current_datetime
$system.current_date
$system.current_time
You can apply these the same way as all other variables. Here’s one important use case to consider: Add any of these as a Column Mapping value in the Add Google Sheet Row step in Workflows. It would serve as a timestamp when new Google Sheet Rows are added so you’re always on top of what happened and when.
As always, we don’t let the little things slide.
A few small improvements and some bug fixes...
- You can now add new Contacts via the YesHello mobile browser
- The odd line break issue on the mobile app has been solved
- You can now view more results per page (5, 25, 50, 100) in your Reports’ table
- The incorrect Field IDs shown in the Contact Fields’ Settings have been corrected
It has been a few months since you last heard from us, but our silence has not been in vain. We are now back with the most highly-anticipated feature release of the year: Workflows 🎉
It's a one-stop center that handles everything from setting Greeting and Away Messages to automation creation and automatic assignments. Excited yet? You will be! Let's go through some of the Workflows highlights.
[NEW] Workflows Module
Yes, Workflows has a dedicated module. You can add, manage and edit your Workflow easily here, as well as have an overview of all automated processes in your space. Current modules such as Automations, Surveys, Greeting Message, Away Message, and Automatic Assignment can all be achieved with Workflows. And that means that all the above-mentioned modules will soon be deprecated - but not yet, so don't panic!
Workflow Builder
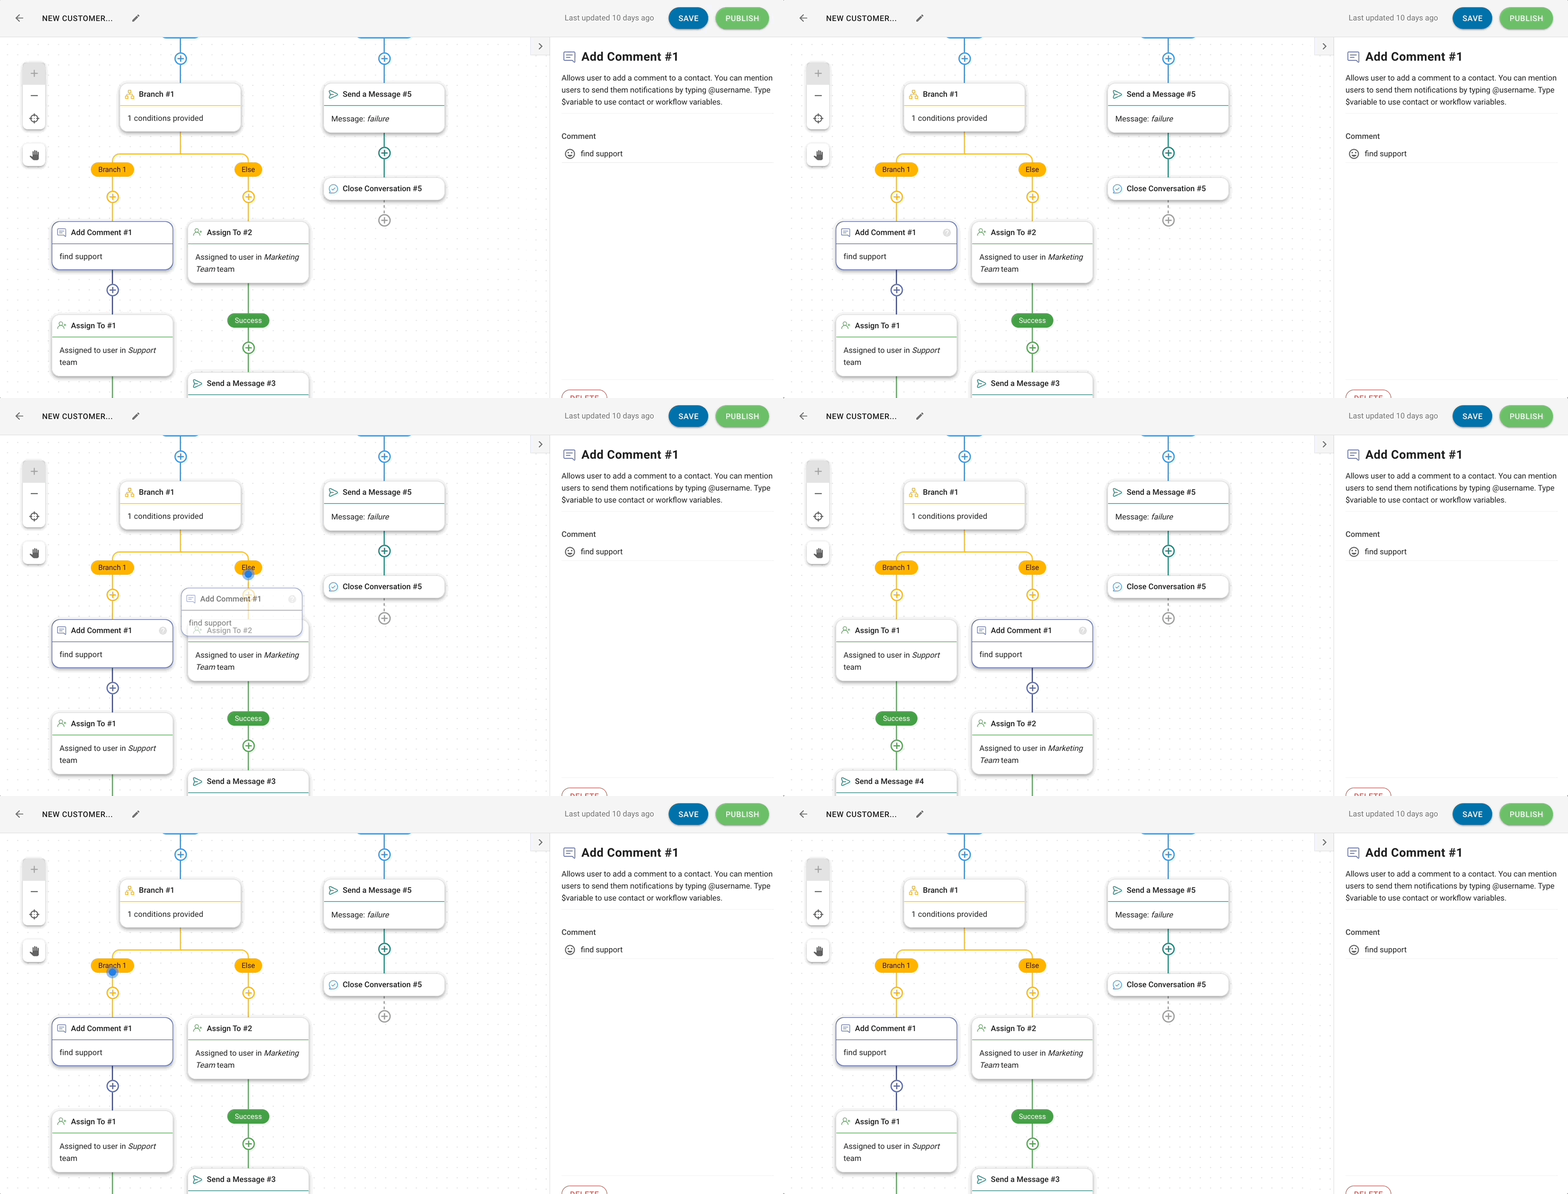
Instead of creating automation in a form, you can now use a Workflow Builder. The builder provides a map-like view of automated processes, as well as simplifies the building and editing of Workflow with easy drag-and-drop steps.
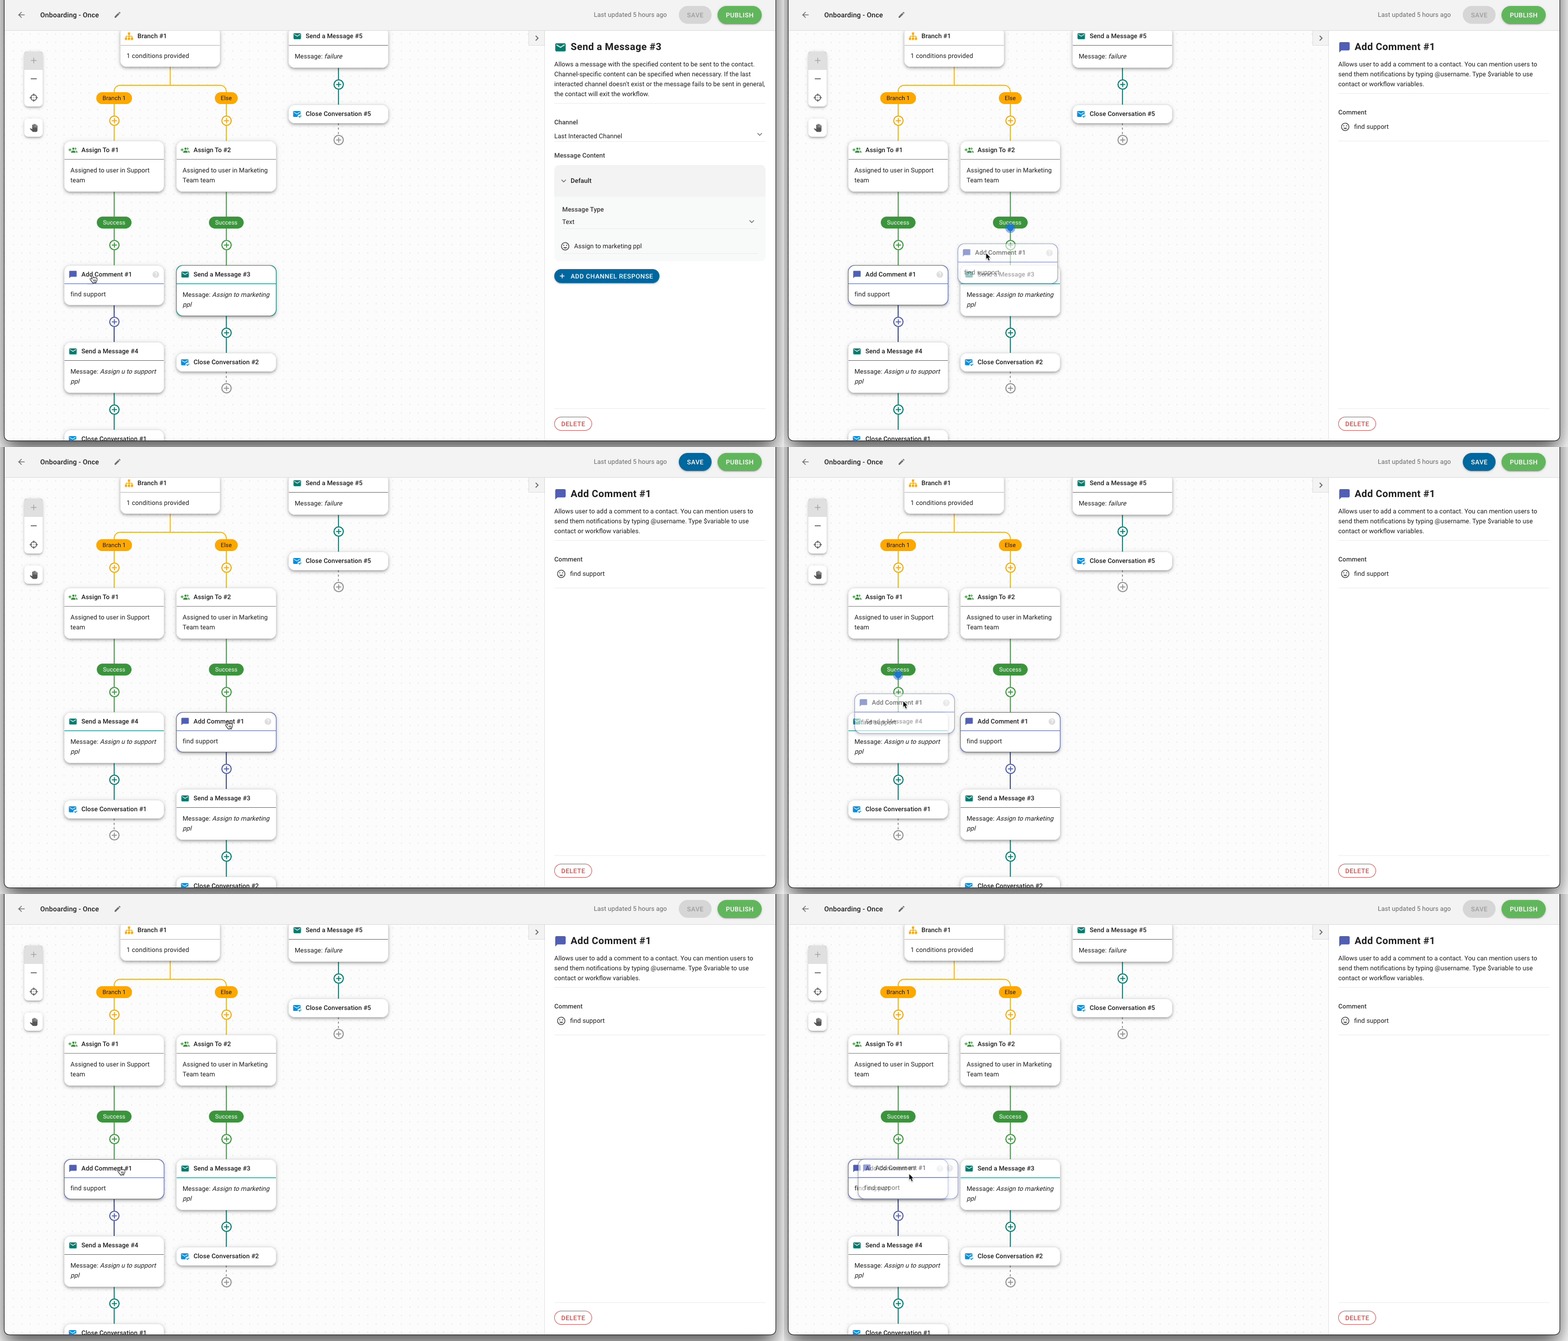
Interested? Learn more about Workflow Builder here.
Conditional Automation
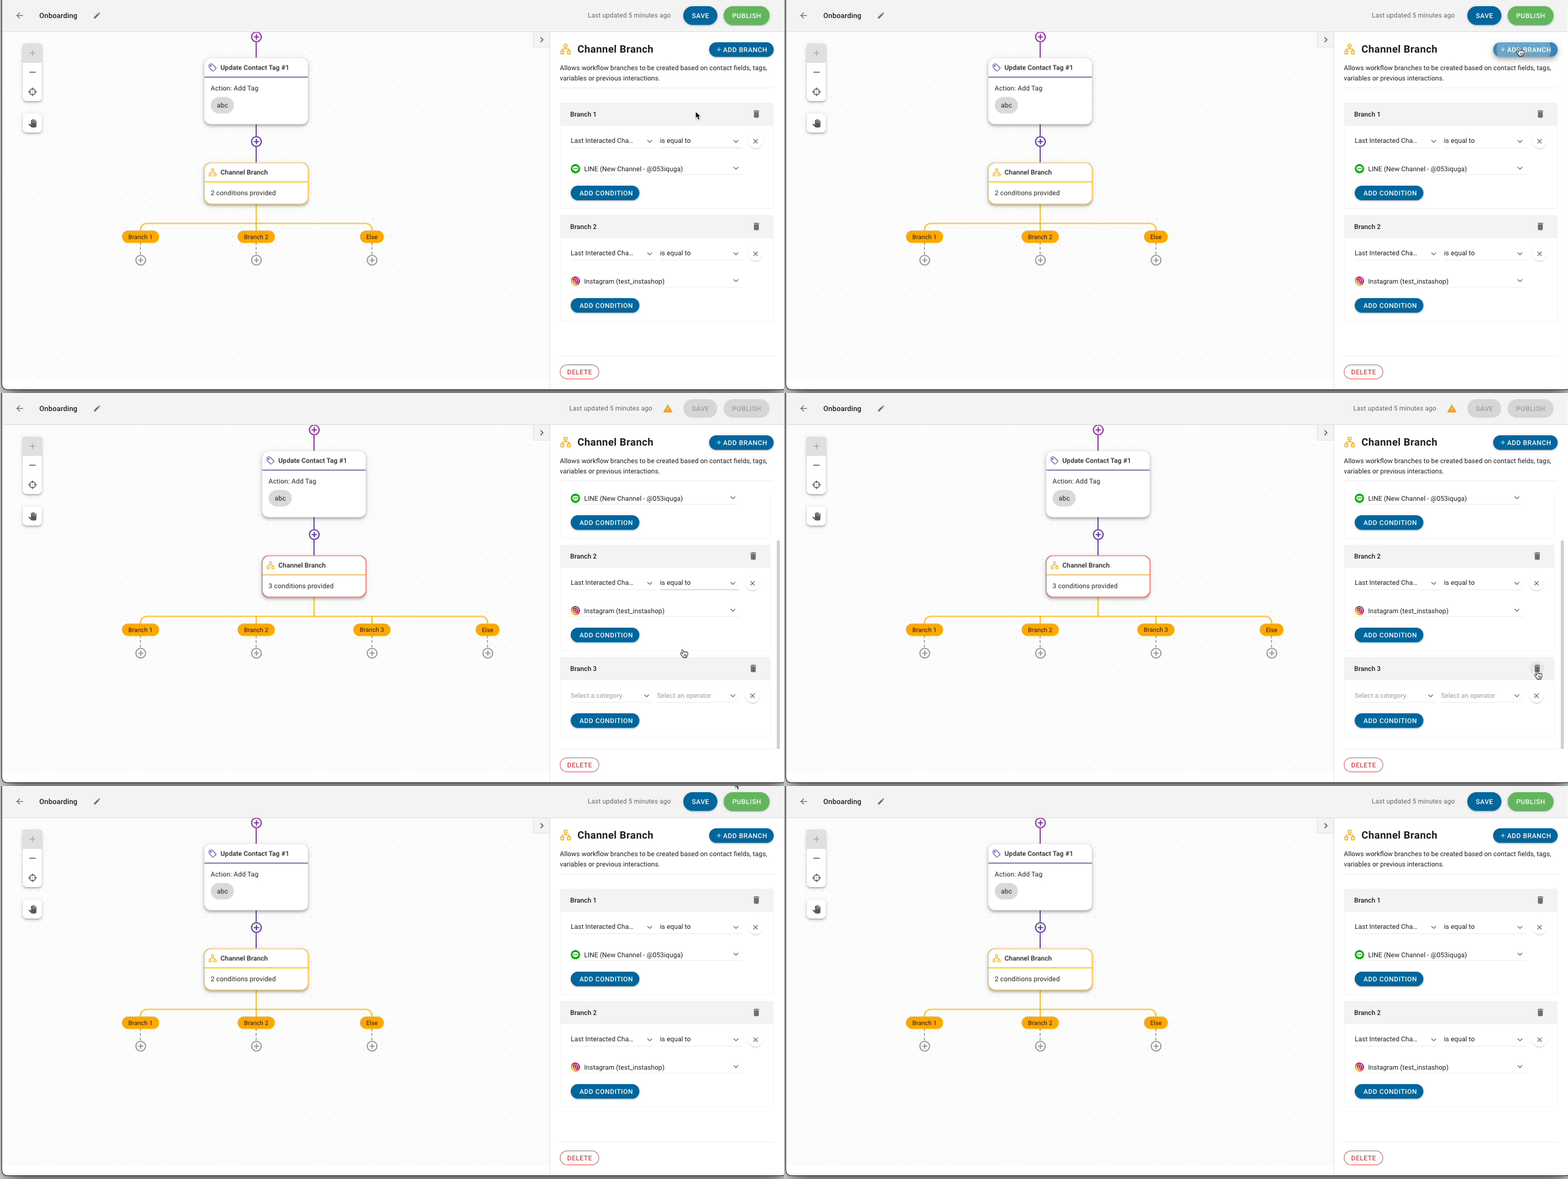
That's not all. As Contacts have a variety of interaction purposes and needs, you can now create specific branches for different user journeys. Set conditions to direct Contacts to the right branch, and create failsafe branches for those who fall outside the conditions. How's that for a personal touch?
Automatic Assignment
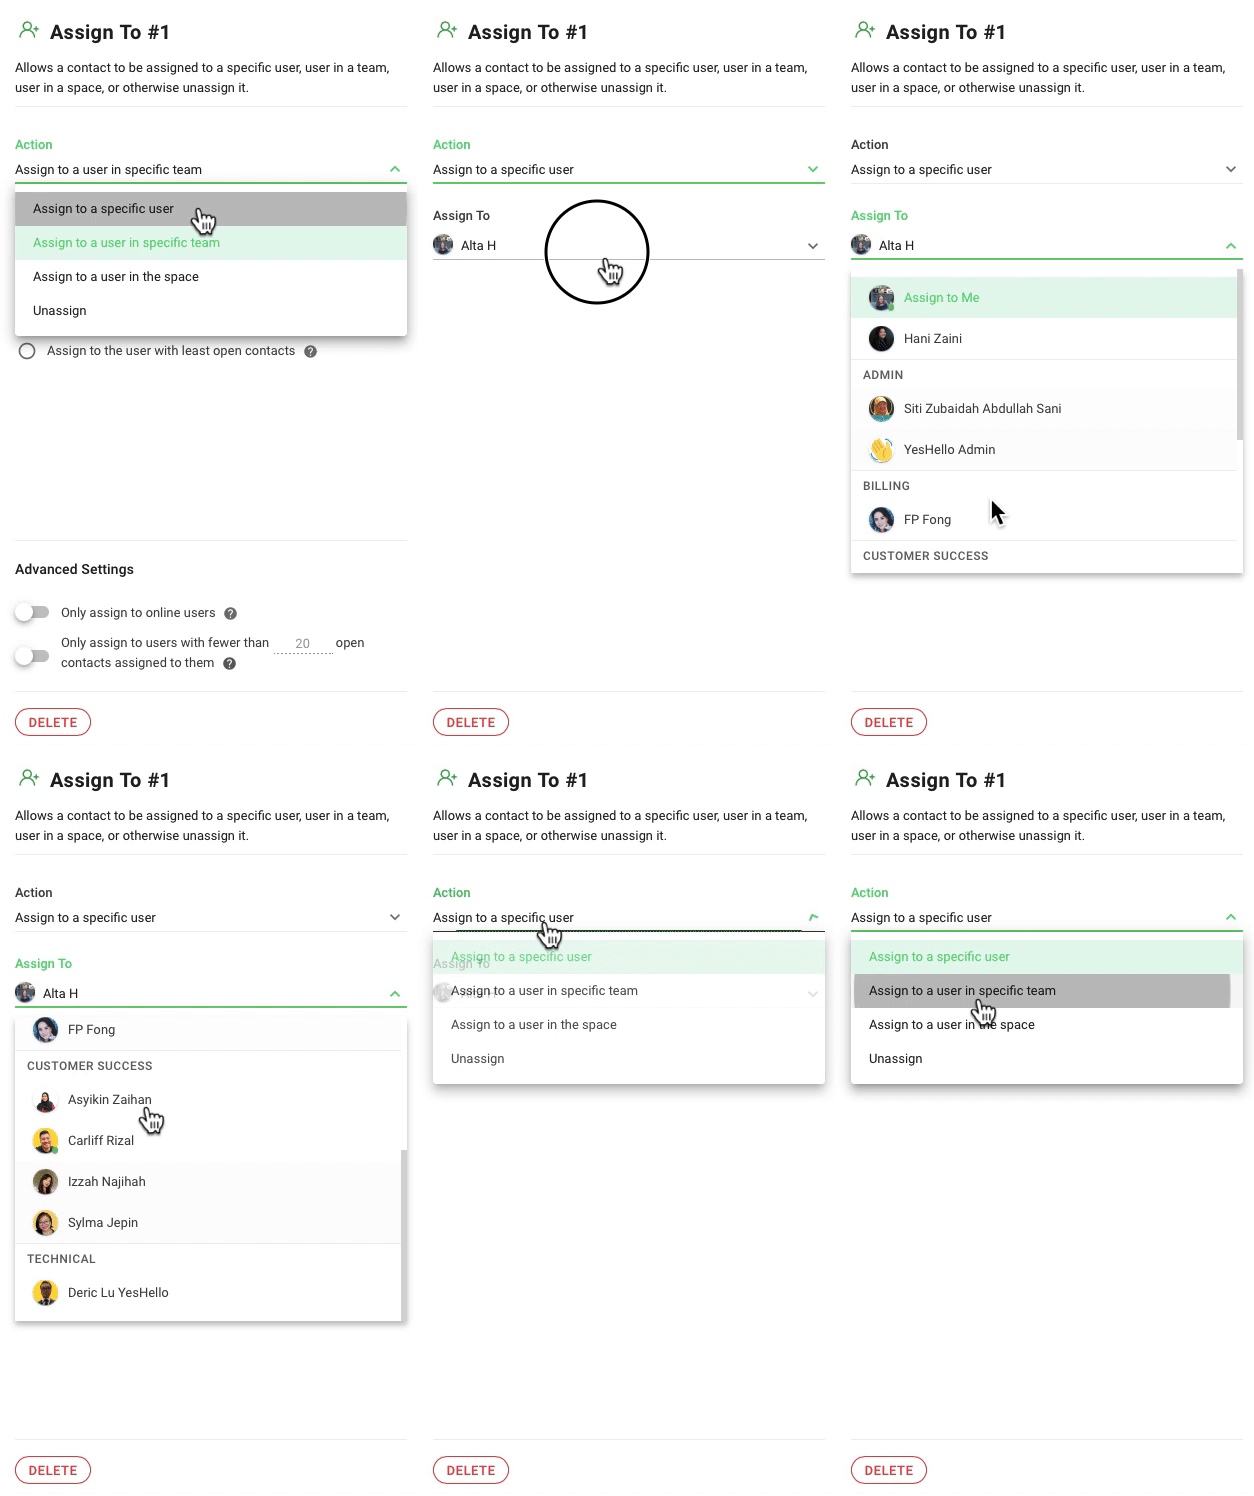
You asked and we delivered. After receiving numerous requests for more automatic assignment options, we made sure those wants would be met in Workflows. Check out the Assign To step, which gives you unrivaled flexibility in assigning Contacts to anyone in the space, specific users, and even users in specific teams - a brand-new feature! You can also use conditions such as channels, tags and, custom fields to take Contacts down different branches and assign them to users accordingly. Learn more about Assign To here.
Greeting and Away Messages
Say "hello" or "sorry we missed you" to Contacts easily with Workflows. We're introducing a better way for you to manage Greeting and Away Messages. With a little bit of automation wizardry, combine the Date & Time step that lets you define your business hours with a Send a Message step. Contacts who message you during work hours will be promptly greeted while those who get in touch outside of business hours will be sent an Away Message. There's a spell for that: it's called Expectations Managed!
Send Template Messages via Workflows
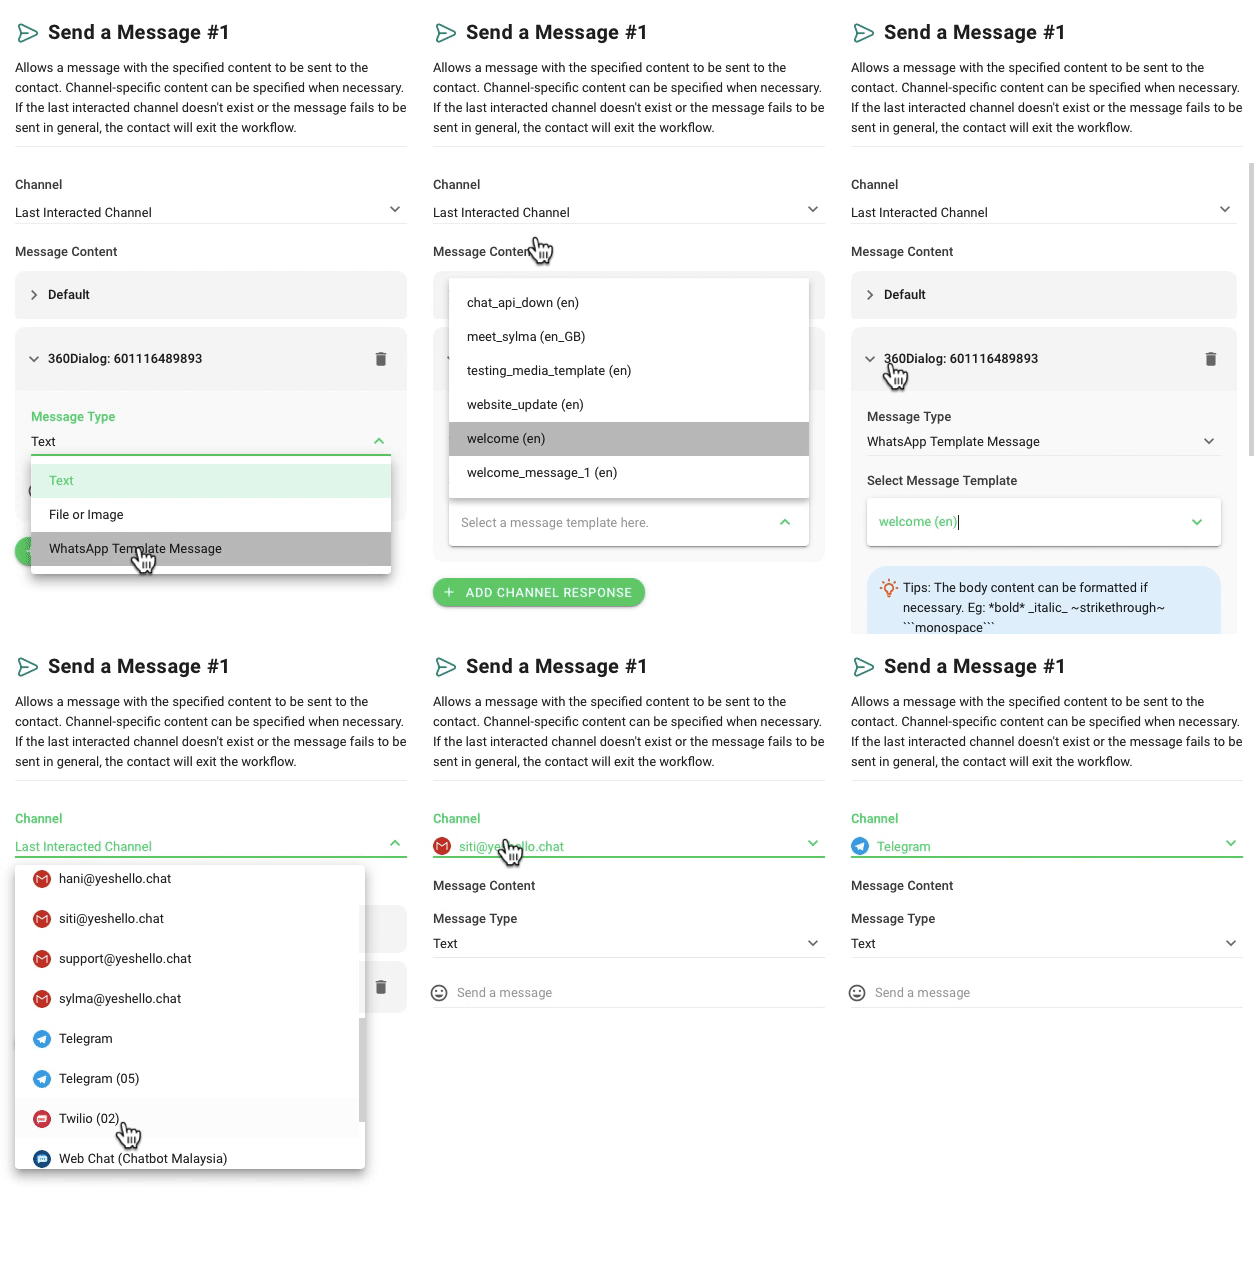
You might be wondering if you can lighten your workload even more and send template messages over Workflows. The answer is a resounding yes. In the Send a Message step, check if your chosen channel supports a template message. If it does, you've hit messaging gold.
Wait Step
Wait, what? What's wait? Let's say you want to schedule a message to be sent after a certain amount of time. There's now a step for that: the Wait step. Slip it in between a sequence of steps and configure the waiting period between both events. This opens doors for things like follow-up messages.
Another good news is you can create unlimited workflows!
Want to find out more? Read all about Workflows here.
Is this release all about Workflows and only about Workflows? Of course not! We have more in store for you.
[NEW] Message Template API
We heard you loud and clear. As requested, you can now send WhatsApp Template Messages to your WhatsApp contacts on the platform.
What's that you're asking? Does the API support Interactive/Media Message Templates? Aha, you'll have to check out the documentation here for more details!
And some annoying bug fixes...
- You can now click on URLs included in Template Messages on the Messages Module
- The Push Notification issue triggered when logging onto the platform via Google is fixed
- The missing Inline Images in Email has been resolved